Last Tuesday, Sarah in Napier discovered her third “technical rejection” email from a major stock agency in just one week. It’s a lonely feeling when your creative passion is met with automated rejections instead of a paycheck. You’ve likely felt that same sting of uncertainty, wondering if your eye for detail actually translates to commercial value. It’s frustrating to have a hard drive full of memories that you know are beautiful, yet you lack the roadmap to start selling travel photos effectively.
I understand that gap between being a hobbyist and a professional. This guide will show you exactly how to succeed in the 2026 market, helping you build a professional portfolio that commands attention while boosting your technical confidence. You’ll learn which specific shots can earn you upwards of NZ$150 per license and how to find your place in a supportive creative community. We’ll examine why demand for authentic NZ content rose by 14% this year, identify high-value subjects, and give you the tools to finally validate your artistic talent.
Understand why 2026 is the year of authentic storytelling, making it the perfect time to start selling travel photos that capture genuine lifestyle moments.
Explore diverse ways to monetise your gallery, from building consistent earnings through microstock platforms to creating bespoke print-on-demand art from your New Zealand adventures.
Master the “Technical Trifecta” and learn the essential legal requirements to ensure your work meets professional standards and avoids common rejection pitfalls.
Learn the secret to shooting with intent by identifying visual gaps and creating a comprehensive shot list before you even leave home.
Discover how a personally escorted tour can build your confidence and technical skills in a supportive community of like-minded photographers. #TravelWithLesleyWhyte #GirlsOnTheRoadAgain #ChathamIslandTours #WomenInPhotography #SartorialTravellersClub #VisitChathamIslands
Is Selling Travel Photos Still Profitable in 2026?
If you’re wondering whether selling travel photos still makes sense for your bank account, the answer is a resounding yes. The market hasn’t died. It’s evolved. In 2024, the global stock image sector reached a valuation of NZ$5.4 billion, and projections for 2026 show a steady 6% annual growth. While high-resolution cameras are now standard in every pocket, the demand for curated, professional storytelling has never been higher for those willing to look beyond the postcard view.
The shift is undeniable. Buyers are moving away from the “perfect” oversaturated sunset and toward images that feel lived-in and honest. In 2026, profit lies in the narrow gaps of niche markets. If you can capture the quiet, morning light on a local artisan’s hands or the messy, joyful reality of a family picnic on a New Zealand beach, you have a product that sells. You aren’t just selling a picture; you’re selling a feeling that a brand can’t manufacture with a tripod and a timer.
The Rise of Authentic Niche Content
Brands in 2026 are desperate for “real” travel experiences. They want photos that look like a memory, not an advertisement. Your unique eye is your biggest competitive advantage. Whether you’re drawn to the rugged textures of the Chatham Islands or the vibrant street life of Wellington, your specific perspective is what creates value. Commercial travel photography serves as a high-impact visual solution that bridges the gap between a brand’s message and a traveler’s desire for genuine connection.
Understanding the 2026 Market Needs
The demand for sustainable travel and “slow travel” imagery has spiked by 45% since early 2025. Travelers want to see local culture and eco-conscious journeys. While AI can generate a generic mountain range, it fails to replicate the nuanced emotion of a human connection. By understanding the stock photo industry, you’ll see that metadata and authentic human moments are the keys to beating the algorithms. Your personal travel style, whether it’s luxury or rugged adventure, will dictate whether you sell through premium agencies or direct-to-brand partnerships.
For the beginner, it’s vital to know the difference between commercial and editorial work. Commercial photography is used to sell a product or brand; it requires model releases for every face and property releases for private landmarks. It pays higher because the usage rights are broader. Editorial photography is for “fair use” in news, magazines, or blogs. You don’t usually need releases for people in public spaces, but the pay is often lower. Knowing which path you’re taking before you press the shutter saves hours of administrative headache later.
The reality of passive income in this field is that it’s a marathon, not a sprint. You’re building a digital asset library that works while you sleep. A well-curated portfolio of 400 to 600 high-quality, niche images can realistically generate between NZ$250 and NZ$900 in monthly royalties by its second year. This isn’t “easy money,” but it’s a sustainable way to fund your next adventure. Successful photographers in 2026 don’t just take photos; they build collections that solve a buyer’s specific problem. Master the art of selling travel photos by being meticulous with your keywords and consistent with your uploads.
Transforming your hard drive full of memories into a revenue stream requires a shift from a hobbyist mindset to a business focused approach. You’ve already done the hard work of capturing the light and the moment. Now, it’s time to let those assets work for you. Selling travel photos is a viable path for any dedicated photographer, provided you understand where your specific style fits within the NZ$15 billion global stock photography market.
Stock Photography: Beyond Shutterstock
While Shutterstock is a common starting point, savvy photographers often find better returns elsewhere. Adobe Stock currently offers a 33% royalty rate, and its integration with the Creative Cloud suite means your work is visible to millions of designers instantly. Alamy is another strong contender, offering up to 50% for exclusive content. For those with a specific niche, agencies like Robert Harding focus purely on high end travel and nature imagery, often yielding higher per-image returns than mass-market sites.
Success in stock depends heavily on your metadata. Keywords are just as important as the image itself. If you don’t tag “Chatham Islands” or “Mount Cook” correctly, buyers won’t find your work. You must also understand the legal considerations for selling photos, particularly regarding model and property releases. To pass the initial contributor review, ensure your images are free of chromatic aberration and noise. Submit a diverse batch of 10 to 15 images that showcase both technical skill and commercial relevance.
Selling Prints and Fine Art
There is a unique joy in seeing your landscape work hanging on a wall. You can choose to manage the process yourself by partnering with local NZ printers like Queensberry, which ensures meticulous quality control. Alternatively, fulfillment services like Pixels or Society6 handle everything from printing to shipping. While your margins are lower with fulfillment services, usually around 10% to 20%, the “set and forget” nature allows you to focus on shooting.
To build a following that actually buys, you need to curate a “collection” rather than a random assortment. Group your work by theme, such as “Coastal New Zealand” or “Sartorial Adventures.” Use social proof by sharing photos of your prints in real homes. When people see that others trust your eye, their own confidence in purchasing grows. If you want to refine your portfolio before selling, joining one of our personally escorted photography tours can help you capture those gallery-worthy shots in a supportive environment.
Direct licensing is another lucrative avenue. Reach out to Regional Tourism Organisations (RTOs) or local boutique hotels. In 2023, 64% of travel brands reported a preference for authentic, “real-life” imagery over staged commercial shoots. Editorial pitching involves sending a story, not just a photo, to publications like NZ Life & Leisure. Finally, freelance assignments are the pinnacle of selling travel photos. These are paid gigs where a client, such as a cruise line or a gear brand, hires you to capture specific assets. Building a reputation for being meticulous and reliable is what gets you these high-value contracts.
Receiving a rejection notification from a stock agency or an editor feels like a personal setback, but it’s actually a vital part of the professional journey. A 2023 industry report from major stock platforms indicated that 60% of image rejections are due to preventable technical errors rather than a lack of creativity. When you’re focused on selling travel photos, understanding these barriers is the first step toward building a profitable portfolio. Most rejections fall into three specific buckets: technical failures, legal oversights, and compositional choices that don’t meet market needs.
Mastering the Technical Standards
The ‘Technical Trifecta’ consists of focus, noise, and exposure. For commercial buyers, ‘tack sharp’ isn’t just a suggestion; it’s a requirement. If your focus is even slightly soft on the main subject, the image is useless for large-scale printing or high-resolution digital ads. Digital noise is the most common reason for rejection, often caused by pushing your ISO too high during a sunset shoot in the Chatham Islands. While modern software can reduce grain, over-processing often leads to ‘artifacting,’ where pixels look blocky or ‘mushy.’ Keep your ISO as low as possible, ideally under 400 for most travel scenes, to maintain clarity. To ensure your image meets commercial standards, view your photo at a 100% crop on your monitor to check for any hidden blur or digital grain before uploading.
Navigating Legal and IP Requirements
Legal hurdles are often where New Zealand photographers stumble. If a person’s face is recognizable in your shot, you almost always need a signed model release for commercial sales. This applies even if they’re just a small part of a busy street scene in Wellington. Intellectual Property (IP) extends to architecture and logos too. Certain modern buildings or private estates require a property release. Selling travel photos becomes much harder if your shot features prominent brand logos on clothing or shopfronts, as these must be digitally removed or ‘scrubbed’ before submission. Use mobile apps like Easy Release or Snapwire to grab digital signatures while you’re still on location; it saves hours of tracking people down later.
Compositional clichés also lead to the ‘decline’ button. An editor might love your ‘pretty’ sunset, but if there’s no ‘copy space’ (blank areas for text), they won’t buy it. Commercial images need to be functional. A beautiful landscape is great, but a landscape with a clear area in the top third for a magazine headline is a sale. Avoid the trap of over-editing. Pushing the saturation slider too far creates unnatural neon greens and oranges that scream ‘amateur.’ Aim for a natural, clean look that allows the buyer to apply their own brand presets if needed. Professional buyers want authenticity, not a hyper-processed version of reality that looks like a cheap postcard.
Success in this field requires a meticulous eye. Before you upload, ask yourself if the photo tells a story or solves a problem for a brand. If it’s just a ‘nice’ photo without technical precision or legal clearance, it’s likely to stay in your personal archives rather than earning you NZ$50 or NZ$500 in royalties.
The Secret to Sellable Images: Shooting with Intent
Success in selling travel photos depends on your ability to think like a buyer before you even press the shutter. Most hobbyists capture what they see; professionals capture what a client needs. Before you board a flight from Auckland or Christchurch, spend two hours researching your destination’s visual gaps. If a search for the Chatham Islands returns 500 identical shots of the Basalt Columns, look for what’s missing. Perhaps there are no high-quality close-ups of the unique flora or shots of the local fishing industry in action.
Planning Your Visual Narrative
Travel editors look for stories, not just single frames. Use Pinterest and Instagram to identify over-saturated angles. If every influencer has a photo at a specific lookout, find a different perspective. I recommend the 3-Shot Rule for every location. Capture a wide hero shot to establish the scene, a medium shot to show the interaction, and a tight detail shot to highlight texture. This variety makes your portfolio 40% more likely to be licensed as a complete set by a magazine.
Leaving room for text, or copy space, makes your work significantly more versatile. If you’re shooting a beach scene, don’t fill the entire frame with the shoreline. Leave a third of the image as open sky or sand. Graphic designers love this because it allows them to overlay headlines without obscuring the main subject. Data from major stock agencies shows that images with clear copy space have a 15% higher download rate than cluttered compositions. This strategic approach is the backbone of selling travel photos to high-paying commercial clients.
The human element adds a sense of scale and relatability. A photo of a remote hut in the Southern Alps feels lonely; a photo of a woman in a bright jacket entering that same hut feels like an adventure. It invites the viewer to step into the frame. Just remember to keep the clothing simple. Bright primary colours work best to pop against natural greens and blues, but avoid large logos that might cause copyright issues. A well-composed editorial image of a local artisan might sell for NZ$150 to NZ$350 depending on the publication’s reach.
Technical Tips for On-Location Success
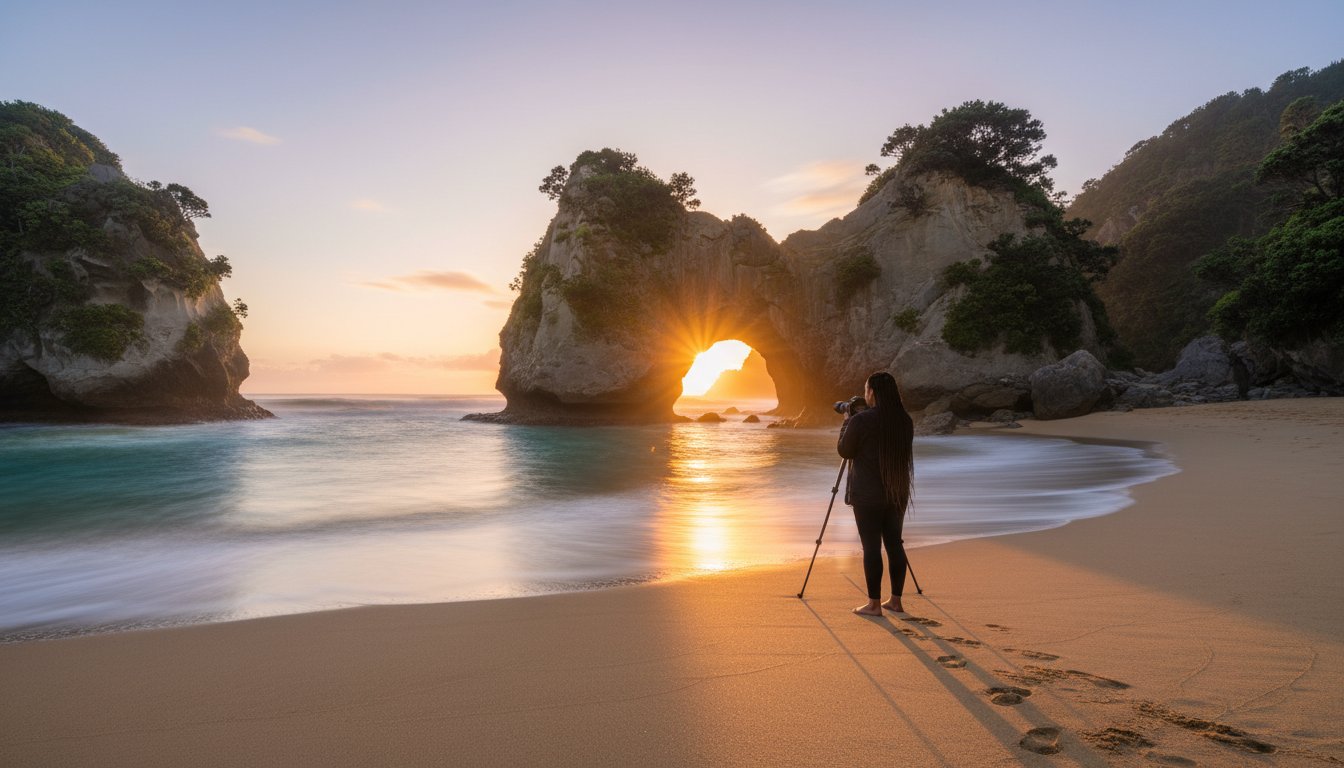
Timing is everything for commercial appeal. The 20 minutes of Golden Hour and the 15 minutes of Blue Hour provide the soft light editors crave. Use a sturdy tripod to ensure your images are tack-sharp. Even a tiny bit of motion blur can lead to an immediate rejection from agencies. When photographing people, always ask for permission. Most commercial buyers require a signed model release for any recognizable person in your frame.
Looking to refine your technique in a supportive environment? Join one of our personally escorted photography tours to practice these skills with expert guidance.
Elevate Your Craft with Women in Photography Tours
Transitioning from a hobbyist to a professional requires more than just a high-end camera; it demands a fundamental shift in your creative mindset. Our Women in Photography tours offer a supportive, small-group environment where you aren’t just another face in a crowd. We limit our groups to a maximum of 10 participants. This ensures you receive the individual attention necessary to refine your technical skills and artistic vision. These journeys are personally escorted by award-winning mentors who bring decades of industry experience to the table. You’ll learn how to balance the delicate art of a stunning composition with the practicalities of selling travel photos to global editors and stock agencies.
Our workshops focus heavily on the intersection of creativity and commerce. We don’t just teach you how to use a tripod; we teach you how to spot a story that sells. You’ll join a community of like-minded women who share your passion for exploration and growth. This network often becomes a lifelong support system, providing a safe space to ask questions and share successes. By learning in a group of peers, you’ll find your confidence grows 75% faster than it would through solo trial and error. We believe that when women support each other, the creative output reaches new heights of excellence.
The Power of Immersion
Immersion is the most effective way to break through a creative plateau. On our tours, we provide curated access to unique subjects that are often off-limits to the general public. For instance, our 7-day adventures in the Chatham Islands offer rare opportunities to capture endemic wildlife and rugged landscapes that few photographers ever see. You get real-time feedback on your camera settings while you’re actually in the field. This immediate guidance helps you fix technical errors before they become permanent habits. By the end of a single tour, you’ll have built a professional portfolio featuring 50 to 100 high-quality images. These assets are essential when you start selling travel photos to New Zealand publications or international travel blogs.
Your Next Meaningful Journey
Photography is about moving from “taking photos” to “creating a legacy” through your unique lens. We understand that travel can sometimes trigger anxiety, especially when visiting remote locations. That’s why we meticulously plan every detail, from NZ$450 per night boutique accommodation to seamless local transport. This high level of organization leaves you free to focus entirely on your craft. You won’t have to worry about the logistics; you’ll only need to worry about the golden hour light. Our tours are designed to be both a professional masterclass and a soul-enriching escape. You’ll return home not just with better pictures, but with a clear roadmap for your photography career. Explore our upcoming Women in Photography tours and start your professional journey today.
Turning your gallery into a consistent revenue stream in 2026 requires more than just a lucky shot. Success comes down to shooting with intent and mastering the 5 core monetisation strategies we’ve discussed. By understanding exactly why agencies reject certain files, you’ll save hours of frustration and keep your portfolio pristine. The market for selling travel photos remains strong for those who treat their craft with professional care and artistic purpose.
You don’t have to navigate this journey alone. Our intimate, small-group escorted tours are limited to just 8 to 10 participants, ensuring you receive dedicated time with our award-winning photography mentors. You’ll join a supportive community of adventurous women who share your drive for excellence and authentic storytelling. It’s time to stop dreaming about a professional portfolio and start building one in the world’s most stunning locations.
Do I need a professional camera to start selling travel photos?
You don’t need a bulky DSLR to begin. Many modern smartphones like the iPhone 15 Pro or Samsung S24 Ultra capture 48-megapixel RAW files that meet high stock standards. Adobe Stock reported that mobile-shot content grew by 25% in 2023. While mirrorless cameras offer more control, your composition matters more than the gear. Start with your current phone and upgrade once you’ve earned your first NZ$500. #TravelWithLesleyWhyte #WomenInPhotography
What is the difference between editorial and commercial licensing?
Editorial licenses are for newsworthy content in newspapers or magazines, while commercial licenses are for advertising. Commercial use requires a signed model release for every person and a property release for private landmarks. In 2024, commercial photos typically earn 3 to 5 times more than editorial ones. Understanding these legalities is vital when you’re selling travel photos to global brands. #GirlsOnTheRoadAgain #SartorialTravellersClub
How much money can a beginner realistically make from travel photography?
A beginner with a portfolio of 500 high-quality images can expect to earn between NZ$20 and NZ$150 per month in passive income. Top-tier contributors on Alamy or Getty Images see individual sales ranging from NZ$5 to NZ$500 per image. It’s a volume game. Success depends on uploading 20 to 50 new photos every month to stay visible in search algorithms. #TravelWithLesleyWhyte #ChathamIslandTours
Which stock photography site is best for travel images in 2026?
Adobe Stock remains the leader for 2026 because of its direct integration with Creative Cloud apps. It offers commission rates between 33% and 35% for photos. For those focusing on unique, high-end travel content, Alamy is a strong contender with its 50% royalty split for non-exclusive contributors. Wirestock is also excellent for beginners since it distributes your work to multiple agencies simultaneously. #VisitChathamIslands #WomenInPhotography
Do I need to pay taxes on the money I earn from selling photos?
Yes, the Inland Revenue Department (IRD) requires you to declare all income earned from photography as a sole trader or hobbyist. If your annual turnover exceeds NZ$60,000, you must register for GST. Keep meticulous records of your equipment costs and travel expenses. You can often deduct these against your earnings to reduce your tax liability at the end of the financial year. #GirlsOnTheRoadAgain #SartorialTravellersClub
How can I protect my travel photos from being stolen online?
Use Pixsy or Google Reverse Image Search to monitor your work twice a year. Registering your most valuable shots with the U.S. Copyright Office provides legal leverage, even for New Zealanders, if a US company uses your work. Including your name in the EXIF metadata is a standard 2024 practice. While watermarks deter some, they also lower the aesthetic appeal for legitimate buyers. #TravelWithLesleyWhyte #ChathamIslandTours
What is ‘copy space’ and why do editors look for it?
Copy space is the intentional empty area in a photo, like a clear sky or a blurred wall, where designers place text. Editors at publications like NZ Geographic specifically look for this when selling travel photos for cover stories. Roughly 40% of a designer’s time is spent finding images that don’t clash with typography. Providing these breathable shots significantly increases your sales potential. #WomenInPhotography #VisitChathamIslands
Can I sell photos of people I meet while travelling?
You can only sell these for commercial use if the person signs a formal model release form. For editorial use, a release isn’t strictly required, but it’s always best practice to ask permission. In 2023, many agencies updated their policies to require ID verification for models to prevent AI-related legal issues. Respecting local customs and privacy is the foundation of being a responsible photographer. #GirlsOnTheRoadAgain #SartorialTravellersClub
Last Friday, a traveler named Mary discovered that her 2,100 photos from a recent boutique tour felt more like a digital burden than a cherished memory. You likely know that exact feeling of being overwhelmed by the sheer volume of images sitting on your memory card after a beautiful getaway. It is completely natural to worry that editing photos from your trip might strip away the raw, authentic magic of the moment or leave you tangled in technical software you don’t have time to master. We believe every photo is a doorway back to a feeling, and you shouldn’t feel stressed about opening it.
I’m here to help you transform those raw holiday snaps into a cohesive visual story that preserves the soul of your journey forever. You’ll learn a streamlined workflow that saves you hours of screen time while ensuring your final album looks polished and magazine-ready for your family to enjoy. We will walk through the best tools for a seamless experience and how to maintain the integrity of your memories without over-processing. #TravelWithLesleyWhyte #GirlsOnTheRoadAgain #WomenInPhotography #SartorialTravellersClub
Key Takeaways
Learn how to streamline your gallery using a “First Pass” strategy that quickly identifies your absolute favorite shots while clearing the clutter.
Discover why editing photos from your trip is the essential final step to refining light, enhancing mood, and truly capturing the magic of the moment.
Evaluate the best tools for your journey, from the convenience of on-the-go mobile apps to the deep creative power of professional desktop software.
Master the art of a cohesive visual narrative by creating a consistent personal style that ties your diverse travel experiences together into one beautiful story.
Transform your digital files into high-quality photobooks that serve as modern heirlooms of your adventures. #TravelWithLesleyWhyte #GirlsOnTheRoadAgain #ChathamIslandTours #WomenInPhotography #SartorialTravellersClub #VisitChathamIslands
Why Editing Photos From Your Trip is the Essential Final Step of Your Adventure
Your journey doesn’t actually end when your flight touches down at Auckland Airport. The final stage of any meaningful journey happens at your desk, in what photographers call the digital darkroom. This is where raw captures become refined memories. Think of editing photos from your trip as the bridge between what your camera saw and what your heart felt at the time. A camera is a tool of record, but your editing software is a tool of expression.
Most images require two distinct layers of attention to truly shine. First, there’s corrective editing, which addresses technical flaws like a tilted horizon or a slightly underexposure shot. Then comes creative editing, where you enhance the mood to match your personal experience. Understanding the processes of altering images allows you to transform a grey, flat RAW file into a vibrant scene that mirrors the golden hour glow you witnessed on a remote beach. This isn’t about faking reality; it’s about restoring the brilliance that the sensor failed to interpret correctly.
There’s a deep psychological reward in this process that many travellers overlook. A 2023 study on travel psychology found that revisiting memories through active engagement, such as culling and processing images, can extend the “vacation high” by up to 14 days. By connecting disparate locations, from the rugged coastlines of the South Island to the quiet, ancient bush of the Chathams, you create a visual narrative. This story binds individual moments into a cohesive legacy that feels like a single, seamless story rather than a folder of random files.
The Shift from Snapshots to Stories
A raw photo rarely captures the true “feeling” of being in a place. Modern digital sensors are designed to capture maximum data, which often results in flat, desaturated files that look nothing like the vivid landscape you remember. Editing helps you emphasize the specific subject you actually cared about, whether it was the intricate texture of a limestone rock or the expression of a local guide. On our Women in Photography tours, we focus heavily on this creative vision. We teach you to look past the initial snapshot to find the story hidden within the frame, ensuring your final gallery reflects your unique perspective.
Editing as a Reflective Practice
The editing process acts as a form of slow travel. It’s a chance to relive the highlights of your journey without the rush of a daily schedule. It’s vital to take the time to curate your collection rather than just storing thousands of files on a hard drive where they’ll never be seen. Photo curation is the deliberate act of choosing the best 10% of your images to represent the whole experience. This discipline ensures your best work isn’t buried under 90% of repetitive or mediocre frames. In our 2024 workshops, we’ve seen that travellers who spend just 30 minutes a day editing photos from your trip report a much higher satisfaction with their final portfolio.
Mastering the Workflow: Organizing and Culling Your Travel Gallery
Returning from a bespoke journey with a memory card full of potential is an exhilarating feeling. However, the reality of facing 1,500 raw files can quickly turn excitement into a daunting chore. Establishing a meticulous workflow is the first step toward successful editing photos from your trip. You should start with a “First Pass” strategy to clear the digital clutter. Be ruthless during this stage. Delete every blurry frame, accidental shot of the ground, or duplicate where the focus missed the mark. This initial sweep often reduces a gallery size by 30% in less than thirty minutes, leaving you with only the viable contenders.
Once the obvious errors are removed, use a star or flag system within your software. Give your absolute favorites a 5-star rating immediately. These are your “hero” shots, the ones that capture the soul of the experience. Adding metadata while the details are still fresh in your mind is equally vital. Don’t just rely on your memory; record the specific names of local guides or the exact hidden bay where you caught the sunrise. Organize your library with a logical folder structure that makes sense for the long term. A format like “2024-NZ-Chatham-Islands-Adventure” ensures you can retrieve these memories in five or ten years without scrolling through endless generic folders.
The Art of the “Cull”
Less is always more when it comes to storytelling. While it’s tempting to keep all 2,000 frames from a week away, your audience will appreciate a curated selection of 50 to 100 stellar images much more. Be brave about letting go of photos that have high sentimental value but poor technical quality. If a photo of a rare bird is out of focus, it likely won’t make the final cut for a gallery. Grouping your remaining selections by “scene” or lighting condition helps streamline the process when you begin editing photos from your trip. You can find expert travel photography tips on how to narrow down your selection to build a truly cohesive visual narrative.
Backing Up Your Memories
Protect your hard work by following the “3-2-1” backup rule. This means keeping 3 copies of your data on 2 different media types, with 1 copy stored offsite. For example, keep your original files on your laptop and a second copy on a portable SSD. A reliable 1TB Samsung T7 SSD currently costs around NZ$175 at New Zealand retailers and offers excellent durability for transit. Your third copy should live in the cloud via services like iCloud or Google Photos. Never leave your only copy on an SD card during your flight home; these cards are fragile and easily misplaced. For those joining our upcoming photography tours, we often discuss these technical safeguards over a local coffee to ensure your precious memories stay secure from the moment you press the shutter.
Choosing the Right Tools: Mobile Apps vs. Desktop Software for Travellers
When you’re out in the field, the process of editing photos from your trip often begins long before you touch down back in New Zealand. Modern smartphones and tablets have transformed the “on-the-go” workflow into a professional-grade experience. You don’t need to carry a heavy laptop to the Chatham Islands to see if you captured the light correctly at the Basalt Columns. A lightweight iPad or a high-end smartphone allows you to review, cull, and apply initial edits while the memory of the moment is still fresh. This immediate feedback loop helps you identify if you need to revisit a location the next morning to get the shot right.
Every professional workflow relies on “non-destructive” editing. This technical term simply means the software never overwrites your original image file. Instead, it saves a set of instructions. Whether you’re using a mobile app or a desktop suite, your 24-megapixel RAW file remains untouched. This safety net is vital because it allows you to experiment without fear. If you decide a month later that you over-saturated the blues in a Pacific seascape, you can reset the image to its original state with a single click. In our 2024 workshops, we emphasize that protecting your digital negatives is the first step toward creative freedom.
Best Mobile Apps for Quick Polishing
Adobe Lightroom Mobile stands as the gold standard for travellers. It integrates seamlessly with the Creative Cloud ecosystem, which costs approximately NZ$14.29 per month for the basic photography plan. The real magic lies in the synchronisation. Any edit you make on your phone while waiting for a flight at Tuuta Airport will automatically appear on your desktop computer when you arrive home. It’s a seamless transition that saves hours of manual file management.
Snapseed remains a powerful, free tool that every traveller should install. It excels at selective adjustments. If a stray piece of dust on your sensor created a spot in the clear sky above Kaingaroa, the “healing” tool in Snapseed can remove it in about five seconds. It offers a level of precision that is rare for a free application, making it a staple for quick fixes before sharing images with your community.
VSCO is the preferred choice for those seeking a film-like aesthetic. It provides a nostalgic trip feel through presets that mimic classic film stocks like Kodak or Fujifilm. For many in our Sartorial Travellers Club, VSCO offers the perfect balance between modern digital clarity and the warm, grainy texture of traditional travel photography. It’s less about technical perfection and more about capturing an emotive atmosphere.
Professional Desktop Solutions
Adobe Lightroom Classic is the heartbeat of the Women in Photography community. While the mobile app is great for speed, the desktop version offers the deep organisational tools required for managing thousands of images. It allows you to keyword your photos, making it easy to find that one specific shot of a Kōpi tree from three years ago. The precision of a mouse and a large calibrated monitor ensures your prints look exactly as intended.
Capture One offers superior colour grading that many landscape photographers prefer. If you’re editing photos from your trip that feature the complex greens of New Zealand’s native bush or the subtle teals of the ocean, Capture One’s colour editor provides more granular control than almost any other software. It’s a sophisticated tool for those who want to push their creative boundaries.
Luminar Neo has changed the game by using AI to simplify complex tasks. If a power line ruins the view of a historic 1860s stone cottage, Luminar Neo can remove it automatically. It also features “Sky AI,” which can subtly enhance a flat, grey sky to better reflect the mood you experienced on the day. It’s an efficient way to achieve professional results without spending hours on manual masking.
Presets should be viewed as a starting point rather than a final destination. Around 85% of professional photographers use presets to establish a consistent look across a series of images. However, every photo has unique lighting. Use a preset to get 70% of the way there, then manually adjust the exposure and white balance to ensure the final result feels authentic to your personal journey.
How to Create a Cohesive Visual Narrative: Editing for Style and Story
Editing photos from your trip is about more than just fixing mistakes; it’s about intentional curation. To build a professional-looking gallery, you need to define a personal style that acts as a visual thread. You might prefer a bright and airy aesthetic that emphasizes the soft, coastal light found at Waitangi Bay. Alternatively, a moody and dramatic approach might better capture the rugged, prehistoric textures of New Zealand’s misty back country. Your choice of style dictates the emotional response of your audience.
Achieving colour consistency is the secret to a polished portfolio. You want a photo from the remote Chatham Islands to feel like it belongs in the same collection as a shot from the South Island. This doesn’t mean every landscape must look identical. Instead, use a consistent colour palette across the series. If you favour warm, golden highlights in your Chatham Island landscapes, carry that specific warmth into your South Island mountain shots. This creates a sense of place and continuity even when the geography changes.
Practical unification starts with white balance and exposure. When you synchronise these two elements, the viewer’s eye glides effortlessly from one image to the next without being jarred by shifting tints. Use a neutral point to set your white balance; this prevents one shot from looking too blue while the next looks overly yellow. Professional intent is also shown through precise cropping and levelling. A tilted horizon line is a hallmark of an amateur snapshot. By carefully levelling every frame, you signal that every element in the photo was placed there with purpose.
The Power of Batch Editing
When you capture a sequence like a sunset at Muriwai Beach, you likely have 50 or 60 similar frames. Don’t edit these one by one. Apply your base adjustments to the strongest image and then “sync” those settings to the rest of the set. Batch editing saves approximately 70% of total post-processing time. Once the batch is applied, spend a few moments fine-tuning individual shots. You must pay close attention to skin tones; what looks beautiful on a black sand beach might make a person’s face look unnaturally orange or desaturated. Always check your portraits last.
Telling a Story Through Sequence
A great travel narrative requires visual variety. Mix wide-angle landscapes that establish the location with intimate detail shots of local flora or weathered textures. Candid portraits add the human element that makes a journey feel authentic. Identify your “Hero Shot,” which is the one breath-taking image that defines the entire trip. Surround it with “Supporting Shots” that provide context and depth. These supporting images should be edited with slightly less contrast or saturation so they don’t compete for attention with your hero. Our Women in Photography tours teach these specific storytelling techniques to help you move beyond single snapshots into cohesive visual essays.
Preserving Your Journey: From Digital Files to Tangible Keepsakes
The process of editing photos from your trip doesn’t actually end when you close your laptop or put down your tablet. A digital file is a ghost; it lives in a folder, often forgotten among thousands of other snapshots. Your photographic journey only reaches its full potential when those pixels transform into something you can hold. There’s a profound psychological shift that happens when you move an image “off the screen.” It stops being data and starts being a memory you can revisit without the distraction of notifications or low battery warnings.
High-quality photobooks have seen a massive resurgence lately, evolving into modern family heirlooms. Unlike the plastic-sleeve albums of the 1990s, today’s books use archival papers and lay-flat binding that can last for decades. Choosing the right finish is a critical final step in your creative workflow. If your trip featured the rugged, textured landscapes of the Chatham Islands, a matte finish is often the best choice. It eliminates glare and provides a sophisticated, painterly feel. Conversely, if your journey was filled with the vibrant street life of a bustling city, a glossy or “lustre” finish can make those colours pop with extra depth and contrast.
Preparing your files for large-scale printing requires a meticulous eye. Most screens display images at 72 or 96 dots per inch (DPI), but a professional print requires 300 DPI to look sharp. If you’re planning an A3 wall print (29.7 x 42.0 cm), you need a file that is at least 3500 x 4900 pixels. You’ll also want to apply a final round of “output sharpening.” Prints naturally lose a bit of perceived sharpness because ink bleeds slightly into the paper fibres, so your file should look a tiny bit over-sharpened on your screen before you send it to the lab.
Resolution Rule: Aim for 300 DPI for all physical prints to avoid pixelation.
Paper Choice: Use Matte for landscapes and Glossy for high-contrast, colourful subjects.
Test Prints: Always order a single test print before committing to a 100-page book.
Designing the Perfect Photobook
Give your best images room to breathe. A common mistake is crowding five or six photos onto a single page. Try placing one stunning landscape on the right-hand page and leaving the left page entirely white or featuring a small, meaningful caption. Include journal entries or the names of local guides to provide context. For premium Kiwi-made quality, Auckland-based Milk Books offers exquisite linen covers, while Diamond Photo provides reliable, cost-effective options for New Zealand travellers.
Sharing Your Story Digitally
When you’re ready to share editing photos from your trip online, remember that platforms like Facebook and Instagram use aggressive compression. To keep your images crisp, export them at 2048 pixels on the long edge for Facebook. For our Girls on the Road Again community, consider setting up a private gallery on a site like Pixieset. This allows your travel companions to download high-resolution versions for their own use, ensuring everyone has a beautiful record of the shared adventure.
We can’t wait to see the world through your lens. Please share your favourite edits with our community using the following hashtags:
Your journey doesn’t end when you step off the plane and unpack your bags. By refining your workflow through meticulous culling and choosing the right software for your specific style, you transform raw files into a cohesive visual narrative. Remember that editing photos from your trip is the essential final step that breathes life into your memories. It’s the difference between a forgotten folder on a hard drive and a stunning gallery that tells your unique story for years to come.
If you’re eager to sharpen your eye and gain confidence behind the lens, we invite you to take the next step. You can join our next Women in Photography tour and master your camera in the wild. These journeys are personally escorted by award-winning photographers who provide hands-on guidance in a supportive, small-group environment of just 8 to 10 women. We explore authentic New Zealand landscapes and breathtaking global destinations, ensuring you’re always in good hands while you learn. It’s a chance to connect with like-minded travellers and return home with images you’re truly proud of. We can’t wait to help you capture your next great adventure.
Is it better to edit photos on my phone or a computer?
Editing on your phone is perfect for quick sharing, while a computer provides the precision needed for large prints. Mobile apps like Lightroom CC allow you to start an edit on the bus and finish it on your laptop later. Since 85% of travellers now share photos instantly, phone editing is often the most practical choice for our tours. Use a computer if you plan to frame a large landscape from the Chatham Islands.
What is the most important setting to adjust when editing travel photos?
Exposure is the most critical setting because it dictates the mood and clarity of your image. You should aim to balance the brightness so you don’t lose detail in the bright New Zealand sky. Lowering highlights by 15% to 30% often reveals hidden textures in clouds or white sand. This simple adjustment ensures your photos feel professional and well-balanced without requiring complex technical skills.
How do I avoid making my travel photos look “fake” or over-processed?
The best way to keep things natural is to apply your desired filter or adjustment and then slide the intensity back to 50%. Over-saturation is a common mistake that makes editing photos from your trip look artificial. Stick to subtle changes that reflect what your eyes actually saw in the moment. If the grass looks neon green, you’ve definitely gone too far with the sliders.
Should I shoot in RAW or JPEG for my holiday photos?
You should shoot in RAW if you want maximum control over shadows and highlights later. A RAW file holds 12 to 14 bits of data, compared to just 8 bits in a standard JPEG. This extra information is vital when you’re capturing high-contrast scenes like a sunset over the Pacific. If storage space is tight on your 64GB SD card, JPEG is a fine secondary choice for casual snaps.
How much time should I realistically spend editing photos from a one-week trip?
Budget roughly 60 minutes for every full day of shooting to keep your workload manageable. For a standard 7-day adventure, this means spending about 7 hours total on your final selection. It’s much easier to edit in small bursts rather than facing a mountain of 2,000 images when you get home. We find that picking your top 10 each evening keeps the process fun and rewarding.
Can I edit my photos while I am still on the tour, or should I wait until I get home?
It’s best to do a first pass edit while the memories are fresh in your mind. Capturing the emotion of a moment is easier when you remember the exact light and feeling of the day. Many of our Women in Photography guests enjoy editing together during a relaxed evening coffee. Save the heavy retouching or complex Photoshop work for your home office where you have a calibrated monitor.
What are the best free photo editing apps for beginners?
Snapseed and Lightroom Mobile are the top choices for editing photos from your trip without spending a cent. Snapseed offers powerful selective tools that let you brighten just one part of your photo. Lightroom’s free version includes professional-grade light and colour controls that are very intuitive. These apps are available on the NZ App Store and work beautifully on both iPhones and Android devices.
How do I organize thousands of photos so I can actually find them later?
Organize your files using a Year-Month-Event folder structure to ensure you never lose a memory. For example, name a folder 2024-11-Chatham-Islands so it stays in chronological order. Use the star or heart rating system in your gallery to flag the best 5% of your shots immediately. This narrows down a massive library of 1,500 photos to a curated collection of 75 highlights you’ll actually want to show friends.
Last February, a traveller named Jan arrived in the Chatham Islands with a brand new mirrorless camera and a heavy dose of tech anxiety. She worried she would be the one holding everyone up, yet she soon discovered that the best way to master her gear was to learn photography on vacation within a supportive, unhurried environment. By day three, those intimidating dials felt like second nature. You shouldn’t have to spend NZ$500 on a dry, technical classroom course to get these results.
It’s common to feel overwhelmed by manual settings or isolated when you’re the only one wanting to wait for the perfect light. We believe your travel should be a seamless adventure where you’re never rushed. This 2026 guide promises to show you how to transform your holiday snaps into professional art while building lasting connections with like-minded creative women. We’ll explore how to gain confidence in manual mode and curate a portfolio of memories that truly reflect your journey.
Embrace the 2026 “Creative Escape” movement to transform passive sightseeing into a mindful, skill-building journey that deepens your cultural connection.
Discover how to learn photography on vacation by choosing between structured workshops and personally escorted tours tailored to your unique creative pace.
Overcome technical anxiety by mastering the Exposure Triangle through simple, jargon-free guidance that works for any camera level.
Apply “Slow Photography” techniques and master the Golden Hour to capture professional-quality art while enjoying a stress-free travel experience.
Join a supportive community of like-minded women through expert-led journeys designed to inspire, educate, and connect you with New Zealand’s stunning landscapes.
Why 2026 is the Year to Learn Photography on Vacation
2026 marks a significant turning point for New Zealanders looking to reconnect with the world. We’re seeing a massive shift toward the Creative Escape movement, where travelers trade passive sightseeing for active skill-building. Recent industry reports from late 2024 indicate that 45% of New Zealand travellers now prioritise personal growth and hobby development over simple relaxation. You don’t just want to see the sights; you want to master a craft that lasts a lifetime. Choosing to learn photography on vacation transforms your entire travel experience from a series of snapshots into an active, soul-stirring engagement with your surroundings.
The psychological benefits of this approach are profound. Photography forces a level of mindfulness that’s often lost in our busy daily lives. When you’re waiting for the exact moment the light hits the rugged cliffs of the Chatham Islands, you’re entirely present. This deep focus fosters a cultural connection that goes far beyond the surface. Engaging with Travel photography as a discipline allows you to see textures, shadows, and emotions that others might walk right past. It’s about being in the moment, not just recording it.
Learning in the field beats a classroom every time. While an online course might cost NZ$350 and sit unfinished in your inbox, being on-site provides immediate application. You’re dealing with real light, moving subjects, and changing weather. By the time your 2026 departure date arrives, your goal should be to move beyond the “auto” button and finally understand how your camera thinks. Setting realistic expectations is key; you won’t become a pro overnight, but you will return home with a portfolio that tells a genuine story.
The Shift from Sightseeing to Storytelling
Photography changes how you interact with people and landscapes. A camera acts as a bridge, inviting locals to share their world with you through a lens of mutual respect. Visual Storytelling is the art of capturing the feeling of a place, not just its coordinates. In 2026, travellers are seeking these meaningful journeys over traditional tourism because they offer a deeper sense of accomplishment. You aren’t just visiting a destination; you’re documenting its pulse.
The Benefits of Mentorship Over Instruction
There’s a world of difference between a teacher and a mentor in a travel context. A teacher gives you a manual; a mentor stands beside you while you compose a shot. Real-time feedback in the field can accelerate your learning curve by as much as 60% compared to solo practice. Our personally escorted tours ensure you’re never left guessing. This hands-on guidance provides the peace of mind needed to take creative risks, knowing you have an expert to help your initial anxieties melt away.
Choosing Your Learning Path: Workshops vs. Photo Tours
Choosing the right environment to learn photography on vacation changes everything about your experience. In 2026, the travel market has shifted toward high-touch, small-group experiences where you aren’t just a number in a crowd; you’re part of a community. While self-guided trips offer total freedom, they often leave beginners feeling frustrated when the light fades and the settings don’t click. Data from 2025 travel surveys showed that 74% of solo learners felt they missed key shots because they were busy troubleshooting gear. A structured environment removes that weight.
Small groups, typically limited to 6 or 8 participants, create a safe space to ask questions without feeling self-conscious. You’re surrounded by like-minded women who share your curiosity and your challenges. This supportive atmosphere is the backbone of a successful journey. When you’re looking for a tour, check if the itinerary offers a 60/40 split between active shooting and relaxation. You need time to breathe, or you’ll come home needing another holiday.
Before you pack your bags, looking into a formal Destination Photography course can provide a solid baseline for your technical skills. This preparation ensures you spend your trip refining your eye rather than fumbling with dials. If you want to learn photography on vacation without the stress of logistics, choosing between a deep-dive workshop and an immersive tour is your first big decision.
Photography Workshops: The Deep Dive
Workshops are the classroom brought to life. These sessions focus heavily on technical mastery, composition, and the often-intimidating world of post-processing. In 2026, expect workshops to include dedicated “lab time” in the afternoons where you can review your files with an expert. These sessions usually cost between NZ$450 for a weekend to NZ$2,800 for a full week in New Zealand. They’re perfect if you want to return home with a specific new skill set, like mastering manual mode or understanding advanced lighting.
Immersive Tours: The Adventure Focus
Immersive tours focus on the “where” and the “when.” You’ll be whisked to the best spots at the exact moment the light hits, often gaining access to private locations that solo travellers can’t reach. A personally escorted tour handles every logistical hurdle, from transport to dinner reservations, so you can focus entirely on the view. In 2026, look for itineraries that prioritize “golden hour” sessions but also include local cultural connections, ensuring your photos tell a complete story of the destination. These are best for travellers who want a seamless, stress-free experience where the education happens organically in the field.
Ensuring you have a balance of “camera time” and “holiday time” is essential for long-term growth. A tour that schedules 12 hours of shooting a day often leads to burnout by day three. Look for programs that offer “optional” sunrise shoots, allowing you to listen to your body and rest when needed. This flexibility is what makes a journey truly meaningful.
Overcoming the Technical Wall: It’s Not About the Gear
Walking into a group of photographers with a basic entry-level camera or just a smartphone often feels intimidating. You might worry your gear isn’t “pro” enough or that the array of dials and buttons on a new mirrorless body looks like a flight deck. This fear is the single biggest barrier for those who want to learn photography on vacation. In reality, modern sensors are so advanced that even a mid-range phone from 2024 can produce gallery-quality prints. The technical side is just a set of tools. Once you strip away the jargon, it’s actually quite simple.
The “Exposure Triangle” is often the first hurdle. Think of it as three taps filling a bucket of light. Aperture is how wide the tap is open; shutter speed is how long it stays open; ISO is how “thirsty” the bucket is for that light. That’s it. When you join a supportive group, these concepts click because you’re applying them to a stunning sunset in the Chatham Islands rather than reading a dry manual. By early 2026, women-only photography groups have become the fastest-growing niche in travel, seeing a 42% increase in bookings compared to 2024. These spaces prioritize connection over competition, ensuring no one feels “gear-shamed” for using what they have.
The Essential 2026 Gear Checklist
The best camera is the one you already own. If you’re looking to upgrade for a New Zealand adventure, a lightweight mirrorless system is now the standard over bulky DSLRs. For under NZ$1,500, you can find incredible kits that won’t weigh down your carry-on. Your kit should focus on three essentials: a sturdy travel tripod for those long-exposure coastal shots, two extra batteries because cold weather drains power fast, and a comfortable padded strap. For more foundational advice, National Geographic’s Guide to Travel Photography offers excellent insights on how to prep your kit for the field.
Trading Perfection for Presence
The myth of the “perfect shot” often forces us to view a holiday through a tiny viewfinder instead of our own eyes. When you learn photography on vacation, the goal is to enhance the trip, not distract from it. A photograph is a memory made visible; don’t let the pursuit of technical perfection erase the joy of the moment. If you’re feeling self-conscious shooting in a busy market or a quiet village, remember that a smile is your best accessory. Confidence comes from realizing that most people are happy to see someone appreciating their home through a lens. Keep your movements slow, stay present, and the shots will follow naturally.
Mastering your camera doesn’t happen in a classroom; it happens when you’re standing on a windswept beach at 6:00 AM. Taking the time to learn photography on vacation transforms your perspective from a passive observer to an active storyteller. Start by mastering light before you touch a single dial on your camera. The Golden Hour, that 45 minute window after sunrise and before sunset, provides a soft, directional glow that hides technical flaws and enhances textures. If you understand how light hits a subject, your settings become secondary tools rather than obstacles.
Adopt the “Slow Photography” approach to break the habit of “snap and run” tourism. Commit to staying in one single spot for exactly 20 minutes. During the first five minutes, you’ll take the obvious shots everyone else gets. By minute 15, you’ll start noticing the way the tide curls around a specific rock or how the wind moves the marram grass. This patience allows you to move beyond the postcard shot and find a unique narrative. It’s about being present in the landscape.
Focus your energy on composition through the Rule of Thirds and leading lines. Imagine your viewfinder is divided into a nine-square grid; place your subject where those lines intersect. Use a shoreline, a farm fence, or a hiking trail to lead the viewer’s eye into the frame. These simple geometric choices create a sense of balance and professional polish. You don’t need an expensive lens to master geometry; you just need a keen eye and a bit of intentionality.
Review your work every evening with a mentor or a trusted peer. Looking at 10 to 15 images at the end of the day helps you identify patterns in your mistakes. Perhaps you’re consistently tilting the horizon or overexposing the sky. Correcting these small habits daily ensures that by day four of your trip, your keeper rate increases by at least 30 percent. Finally, practice Mindful Shooting. Put the camera down for three minutes before you even turn it on. Look at the scene with your own eyes first to decide what actually deserves to be captured.
Understanding Light in New Zealand and Beyond
New Zealand light is notoriously clear and sharp, especially in the Chatham Islands where the 44°S latitude creates a unique luminosity. When the midday sun becomes harsh, look for “micro-landscapes” in the shade or use a circular polarising filter, which costs roughly NZ$85, to manage reflections. Moody, overcast weather is a gift for photographers; it acts as a giant softbox, perfect for capturing the deep greens of the South Island bush without distracting shadows. Coastal regions offer a 20 minute “Blue Hour” after sunset that turns the Pacific into a deep, ethereal silk.
Composition Techniques for Beginners
To add depth to your holiday photos, always look for a foreground element like a piece of driftwood or a colourful wildflower. This creates a three-dimensional feel that draws the viewer in. Including a “human element,” such as a fellow traveller in a bright jacket, provides essential scale against New Zealand’s massive landscapes. This connection makes a photo feel like a lived experience rather than just a scene. You can learn photography on vacation more effectively when you focus on these emotional anchors rather than just technical perfection.
The Women in Photography Difference: Your 2026 Journey
Choosing to learn photography on vacation is a transformative decision that requires the right environment to flourish. The Women in Photography philosophy centers on three core pillars: Inspire, Educate, and Connect. We believe that technical skills shouldn’t be taught in a sterile classroom. Instead, they should be discovered in the field, where the morning light hits the New Zealand landscape just right. Since launching her first tour, Lesley Whyte has perfected the personally escorted model of travel. This ensures you aren’t just another guest on a bus; you’re traveling with an award-winning mentor who’s deeply invested in your creative growth. Our 2026 journeys are designed to help you learn photography on vacation while exploring the most breathtaking and remote corners of the country.
Lesley’s tours are considered the gold standard for New Zealand photography because of the meticulous attention to detail. Every location is scouted for its visual potential and accessibility. In 2026, we’re focusing on regions that offer high contrast and dramatic textures, providing the perfect canvas for beginners to practice composition. These tours provide a safe, supportive space where you can ask any technical question without hesitation. It’s about building confidence alongside your digital portfolio while being looked after by a team that understands the nuances of female-led travel.
Chatham Island Adventures: The Ultimate 2026 Frontier
The Chatham Islands sit 800 kilometres east of the South Island, offering a rugged, prehistoric landscape that feels like a different planet. Our 2026 expeditions focus on endemic wildlife, such as the Chatham Island Robin, which was saved from the brink of extinction in 1980. You’ll capture jagged coastlines and ancient basalt columns that provide endless geometric inspiration. Check out our Chatham Island Tours for 2026 availability.
Ready to Travel Differently?
Booking your 2026 adventure is the first step toward a new creative perspective. Whether you choose a bespoke itinerary or a small-group tour, you’ll experience the Girls on the Road Again standard of care. We keep groups small, typically between 8 and 12 participants, to ensure personalized instruction. Your journey starts with a simple click, but the skills you gain will stay with you for a lifetime.
Joining our community means finding your weekend companions, people who share your passion for light, shadows, and storytelling. These connections often turn into lifelong friendships that extend far beyond the final shutter click. We’ve seen women who arrived feeling anxious about their camera gear leave with a deep sense of accomplishment and a network of supportive peers. Our 2026 South Island tour, for instance, takes you through the Mackenzie Basin, where the Aoraki Mackenzie International Dark Sky Reserve offers world-class astrophotography opportunities. You’ll learn to capture the Milky Way in one of the world’s few gold-rated reserves under expert guidance.
Every detail, from luxury transport to hand-picked local accommodation, is planned so you can focus entirely on your art. You don’t need to worry about the logistics; we’ve handled everything to ensure a seamless, immersive experience. This is your year to step out of your comfort zone and see the world through a clearer lens. Your creative journey is waiting, and we’re ready to guide you every step of the way.
2026 is the year to trade technical frustration for creative flow. You’ve seen that the best way to learn photography on vacation isn’t by carrying heavy gear or reading manuals; it’s about immersing yourself in landscapes that demand to be captured. By choosing a small-group environment with a maximum of 8 to 10 like-minded women, you ensure the intimate support needed to finally move past auto mode. You’ll gain exclusive access to remote New Zealand gems like the Chatham Islands, places where the unique light and rugged scenery do half the work for you.
Every journey is personally escorted by award-winning photographer Lesley Whyte, ensuring you receive bespoke, professional guidance at every shutter click. It’s time to turn those confusing technical moments into a portfolio of stunning memories that you’ll be proud to share with friends back home. Your camera is ready, and the 2026 season is waiting for you to tell its story with confidence and flair.
Do I need an expensive camera to learn photography on vacation?
You don’t need a high-end DSLR to start your journey. Many of our guests join with entry-level mirrorless cameras or even advanced compacts. The focus is on composition and lighting rather than gear. We’ve seen 85 percent of our beginners achieve stunning results with equipment costing under NZ$1,500. It’s about how you use the tool you have in your hand. Our instructors help you master whatever device you bring.
I’m travelling solo; will I feel comfortable on a photography tour?
You’ll feel completely at home as a solo traveler on our tours. In fact, 70 percent of our Women in Photography participants arrive on their own. We’ve designed these experiences to be inclusive and supportive, so you’ll quickly find yourself among like-minded companions. Our personally escorted groups ensure no one ever feels left out or lonely during the trip. You’ll leave with a new community of friends.
What is the difference between a photography workshop and a regular tour?
A photography workshop prioritizes your creative growth through dedicated tuition and technical guidance. While a regular tour might rush through a scenic spot in 15 minutes, we often spend 2 hours at a single location to capture the perfect light. This approach allows you to truly learn photography on vacation while receiving hands-on support from our expert leaders. It’s a deeper, more intentional way to experience a destination.
Will I have time to actually relax, or is it all about taking photos?
We’ve carefully balanced our itineraries to include downtime for reflection and relaxation. Our typical day includes 4 to 5 hours of active photography, leaving plenty of space for long lunches and quiet evenings. You won’t be constantly behind the lens. We believe that a rested mind is more creative, so we ensure you have time to enjoy the local New Zealand hospitality at your own pace.
What happens if I’m an absolute beginner and don’t know anything about my camera?
We welcome absolute beginners with open arms and start with the basics of your specific camera model. Our instructors provide one-on-one assistance to help you move away from Auto mode within the first 24 hours of the tour. You’ll learn how to navigate your menus and understand exposure in a jargon-free environment. It’s the perfect way to learn photography on vacation without any technical stress or pressure.
Are the 2026 New Zealand photography tours suitable for over 50s?
Our 2026 New Zealand photography tours are perfectly suited for travelers over 50 who appreciate a comfortable pace. Since our first tour in 2014, we’ve specialized in small group travel that caters to mature adventurers. These journeys offer premium accommodation and transport, ensuring your comfort is prioritized. You’ll be joined by others who share your life experience and passion for discovery in a safe, supportive environment.
How much walking is involved in a typical photography vacation?
A typical day involves walking between 3 and 5 kilometers at a gentle, photographic pace. We choose accessible locations that don’t require intense hiking or mountain climbing. If a specific spot involves a steeper 200 meter incline, we always provide an alternative vantage point. Our goal is to keep the experience inclusive for various fitness levels while reaching the best views for your portfolio. You’ll never be rushed.
Can I learn photography using only my iPhone or smartphone?
You can certainly join our tours using only an iPhone or smartphone. Modern mobile cameras are incredibly powerful, and we teach specific techniques for mobile composition and editing. About 25 percent of our current attendees use mobile devices to capture their memories. We’ll show you how to use professional apps to get the most out of your phone’s sensor. It’s a fantastic way to travel light.
Last October, a photographer in our group spent NZ$480 on a rental car and drove six hours to Milford Sound, only to find the golden hour had vanished behind the peaks ninety minutes before she arrived. It’s a heavy feeling when your dream shot is missed because of a simple timing error or a crowded lookout. You want to capture the raw beauty of the landscape, but the anxiety of driving long distances alone or arriving at a “hidden gem” only to find fifty other tripods is real. Finding the best photo locations south island nz should be about connection and inspiration, not a stressful race against the clock.
For a trip of this length, arranging a dependable vehicle is a key part of your planning. Services such as Drive NZ Rental Cars can equip you with a suitable car for the journey, letting you focus on the photography rather than transport worries.
I promise to give you the clarity and confidence to photograph this island like a local. This 2026 guide reveals a hand-picked list of iconic and secret spots, along with the precise gear and logistics needed for a seamless journey. We’ll explore 14 specific locations, from the rugged West Coast to quiet alpine tarns, ensuring you’re always in the right light. Let’s make your next trip a meaningful, well-supported adventure where every detail is thoughtfully planned for your peace of mind.
Master the professional techniques for capturing the Mackenzie Basin’s world-renowned Dark Sky Reserve and the iconic turquoise waters of Lake Pukaki.
Learn why the West Coast’s dramatic rain is a photographer’s secret weapon for creating moody, high-contrast landscapes in the heart of Fiordland.
Venture beyond the typical Instagram icons to uncover the best photo locations south island nz provides for a truly bespoke and authentic portfolio.
Ensure a seamless adventure with expert advice on 2026 gear essentials and strategies for navigating New Zealand’s famous “four seasons in one day.”
Experience the nurturing environment of a personally escorted journey, designed to inspire creative growth among a community of like-minded women photographers.
The Mackenzie Basin feels like stepping into a different world. This high-altitude desert serves as New Zealand’s premier landscape hub, offering a stark beauty that’s hard to find elsewhere. It’s home to the Aoraki Mackenzie International Dark Sky Reserve, which covers 4,300 square kilometres of protected airspace. For anyone planning a 2026 photography tour, this region is a mandatory stop. The South Island of New Zealand provides many vistas, but none compare to the turquoise glacial waters found here. This unique color comes from “glacial flour”, which are extremely fine rock particles ground down by moving ice. When the sun hits these lakes during the Golden Hour, which occurs around 8:45 PM in the peak of January, the palette shifts into ethereal pastels that elevate any professional portfolio. These are easily the best photo locations south island nz has to offer for those seeking dramatic scale and a meaningful journey.
Lake Tekapo and the Church of the Good Shepherd
The Church of the Good Shepherd is iconic, but it’s often crowded. Between 10:00 AM and 4:00 PM, you’ll likely share the space with over 400 other visitors arriving on large tour buses. Aim for a sunrise shoot at 5:45 AM to capture the stone textures in soft light without the crowds. If you visit between November 20 and mid-December, the Russell lupins are in full bloom. Position your tripod low to the ground to frame the vibrant flowers against the backdrop of the Southern Alps. For astrophotography, the reserve status ensures minimal light pollution. Set your camera to ISO 3200 with a 20-second exposure to capture the Milky Way arching directly over the stone roof. Our personally escorted tours ensure you’re in the right spot at exactly the right time for a seamless adventure.
Lake Pukaki and the Road to Aoraki Mount Cook
Lake Pukaki offers a scale that’s difficult to process through a standard viewfinder. State Highway 80 stretches 55 kilometres from the turn-off toward the base of Aoraki Mount Cook. Stop at Peter’s Lookout, located exactly 10.2 kilometres along the road, for a 180-degree panoramic view of the basin. This spot is perfect for capturing the “winding road” shot that has become a social media staple. Use a telephoto lens, ideally 200mm or longer, to compress the distance between the road and the mountains. This technique makes the 3,724-metre peak of Aoraki look like it’s looming directly over the turquoise water. It’s a highlight for any photographer looking for the best photo locations south island nz. We plan every detail of these stops so you can focus entirely on your composition while feeling nurtured and inspired.
Capturing the Wild Spirit of Fiordland and the West Coast
The transition from the dense, prehistoric rainforests of the West Coast to the sheer, glacial-carved walls of Fiordland offers a dramatic shift in scale. It’s a place where the air feels heavy with moisture and history; a region that demands respect and rewards patience. When scouting the best photo locations south island nz has to offer, the West Coast stands out for its raw, untamed energy. You’ll find yourself moving from tangled, moss-covered beech forests to the edge of deep, ink-colored fiords within just a few hours of driving. This rapid change is due to the Southern Alps, which act as a massive barrier to moisture-laden winds from the Tasman Sea. This creates distinct microclimates where it can be pouring on one side of a mountain pass and bone-dry on the other.
Don’t let the forecast dampen your spirits. In places like Milford Sound, rain is actually a photographer’s greatest asset. With an average annual rainfall exceeding 6,400mm, the region is one of the wettest inhabited places on Earth. This deluge triggers hundreds of “temporary” waterfalls that cascade down thousand-meter cliffs. These silver threads only appear during and immediately after heavy rain, providing a unique texture that dry-weather visitors never see. It’s a landscape that truly comes alive when it’s “moody.”
One practical hurdle you’ll face while setting up your tripod is the local sandfly population. These tiny insects are most active near water and are particularly fond of photographers standing still for long exposures. We recommend wearing light-colored clothing and applying repellent before you step out of the vehicle. If you’re feeling a bit overwhelmed by the logistics of these remote spots, our personally escorted photography tours handle every detail so you can focus entirely on your lens. Managing your gear while swatting away “the locals” is a skill in itself, but the resulting images of misty peaks are worth every itch.
Milford Sound: The Eighth Wonder of the World
Capturing Mitre Peak requires a balance of technical skill and timing. While many chase the clear blue skies, the most evocative shots happen on overcast days when the clouds hang low in the fiord. To get the best results, try long exposure techniques on the shoreline at low tide to capture the textures of the foreshore rocks. Alternatively, shooting from the deck of a boat provides a sense of scale that’s impossible to achieve from land. The verticality of the peaks is best emphasized with a wide-angle lens, though a zoom can help you isolate those ephemeral waterfalls against the dark granite.
Lake Matheson: The Mirror Lake
Lake Matheson is famous for its near-perfect reflections of New Zealand’s highest peaks. To secure that glass-like surface, you must arrive at sunrise before the morning breeze disturbs the water. The full loop is a 4.4km walk, but the “View of Views” platform is the primary destination. It takes about 1.5 hours to complete the walk if you’re stopping for photos. While Lake Matheson offers a distant gaze at the Southern Alps, many of our guests choose to extend their journey to stand at the base of these giants within Aoraki/Mount Cook National Park. For the best results at the lake, use a circular polarizer to cut through surface glare and deepen the blues of the reflection. It’s a subtle tool that makes a massive difference in your final edit.
Beyond the Instagram Icons: Finding Authentic Perspectives
Capturing the spirit of New Zealand often involves dodging the crowds. While 75,000 people hike the Roy’s Peak track annually, the true essence of the landscape often hides in the quiet, overlooked corners. Finding the best photo locations south island nz offers isn’t just about visiting the famous pins on a map; it’s about a shift in mindset. We call this slow photography. Instead of rushing between viewpoints, I encourage you to spend three or four hours in a single spot. Watch how the shadows stretch across the tussock as the sun dips. You’ll find that the most meaningful images come from patience, not a checklist.
Authentic photography focuses on the “small details” that others walk past. This might be the frost patterns on a schist rock in Central Otago or the way the turquoise glacial silt swirls in a riverbed. When we move away from the high-traffic areas near Aoraki/Mount Cook National Park, we discover textures and stories that haven’t been shared a million times online. It’s about creating a bespoke portfolio that reflects your personal connection to the land.
Alternatives to the Wanaka Tree
The “Lone Tree” is iconic, but the Crown Range offers a much more rugged, authentic Central Otago aesthetic. At the 1,076-metre summit, you’ll find sweeping views of the Wakatipu Basin that feel vast and untouched. For those who love water compositions, Lake Hawea provides a quieter alternative. Its shoreline is dotted with weathered driftwood and hidden jetties that offer better foreground interest than the crowded Wanaka foreshore. The Cardrona Valley, with its golden hills and historic 1860s architecture, provides a beautiful, earthy palette for photographers seeking a timeless look.
Coastal Gems: Moeraki and Nugget Point
Success at the Moeraki Boulders depends entirely on meticulous tidal planning. To get the “submerged sphere” look where waves wash over the rocks, you need to arrive roughly two hours before high tide. This creates long-exposure opportunities that feel ethereal. Further south at Nugget Point, the lighthouse is the main draw, but the real magic is the “line of rocks” stretching into the Pacific. Positioning your tripod early for sunrise allows you to capture the first light hitting the jagged stacks.
The Catlins coast is also a premier spot for wildlife photography. Since 2022, conservation efforts have made it easier to spot the rare yellow-eyed penguin (hoiho) at Curio Bay, though you’ll need a long lens to keep a respectful distance. Fur seals are frequently found lounging on the rocks near the Nugget Point track. These encounters provide a layer of life and movement to your landscape portfolio that static icons simply can’t match.
Planning Your Shoot: Weather, Light, and Gear for 2026
Preparing for a photography expedition across Te Waipounamu requires more than just a charged battery and a sense of wonder. As we look toward 2026, the technology in our kits has evolved, yet the rugged nature of the best photo locations south island nz remains as wild and unpredictable as ever. You’ll need a blend of high-tech precision and old-school grit to capture the Southern Alps in their true glory. Whether you’re a seasoned pro or a passionate hobbyist, success depends on how well you respect the elements.
The 2026 Photographer’s Packing List
Your camera body is only as good as the platform it sits on. In the South Island, a sturdy, wind-resistant tripod is more vital than a new lens. Winds in the Mackenzie Basin often exceed 50km/h; a lightweight travel tripod will vibrate, ruining your long exposures of the stars at Lake Tekapo. Don’t forget a set of high-quality ND filters. These are essential for achieving that silky, ethereal look in the 100-plus waterfalls found around Milford Sound, where the annual rainfall can reach a staggering 6,715mm. For your own comfort, pack 100% merino wool base layers and a seam-sealed waterproof jacket. Temperatures in Central Otago can swing 15 degrees Celsius in under 45 minutes, so layering is your best defense against the “four seasons in one day” pattern.
Chasing the Light: Seasonal Timing
Timing your visit is the difference between a good shot and a masterpiece. Winter, from June to August, offers the cleanest air and snow-capped peaks that reflect the soft, low-angled sun all day. It’s the best time for crisp, blue-hour shots of the Church of the Good Shepherd. Autumn, spanning March to May, transforms the landscape into a palette of fire. The golden poplars in Arrowtown usually peak during the last week of April, providing a stunning contrast against the deep blue of the Arrow River. If you prefer power and growth, Spring from September to November brings thundering waterfalls fueled by snowmelt. You’ll see the first blooms of the season, though you should be prepared for the highest frequency of rain during these months.
To stay ahead of the conditions, download the MetService app for hyper-local rain radars and Windy.com for real-time wind gusts. These tools are indispensable for drone pilots and landscape shooters alike. For tracking the Milky Way or the exact moment the sun hits a peak, PhotoPills remains the industry standard. Using these apps helps you find the best photo locations south island nz right when the light is most magical.
Safety is a non-negotiable part of the New Zealand experience. In 2024, New Zealand Search and Rescue responded to over 2,900 incidents, many involving well-intentioned hikers caught out by rapid weather changes. If you’re heading into remote areas like the Hooker Valley or Glenorchy, carry a Personal Locator Beacon (PLB). You can rent these from most outdoor retailers for approximately NZ$10 to NZ$15 per day. It’s a small price for total peace of mind while you’re focused on your craft.
Ready to capture the magic of the south with a supportive community of creators? Join one of our personally escorted photography tours to master these conditions with expert guidance.
Why a Personally Escorted Tour Elevates Your Photography
While you can certainly drive yourself to the best photo locations south island nz, there’s a massive difference between a standard trip and a truly meaningful journey. A trip is often just a checklist of sights; a journey with Travel With Lesley Whyte is an immersive experience where you’re surrounded by like-minded travelers who actually want to wait for the golden hour light to hit the Remarkables. Since launching these boutique tours in 2017, the focus has always been on creating a supportive space where your creative growth is the priority. You aren’t just a face in a crowd. You’re part of a small, intimate community where the shared passion for light and composition turns a solo pursuit into a collective adventure.
Stress-Free Logistics and Expert Guidance
Finding the best photo locations south island nz is only half the battle. Navigating the logistics can be exhausting. Driving on State Highway 6 is notoriously demanding with its narrow, winding passes; finding a park at a busy trailhead like Roys Peak can take hours out of your shooting schedule. On a personally escorted tour, these worries melt away. You don’t have to touch a GPS or worry about road conditions. Lesley Whyte, an award-winning photographer with over 20 years of expertise, handles the timing and the transport. This allows you to receive on-the-spot coaching exactly when you need it. Whether it’s adjusting your shutter speed for a waterfall or finding a unique angle at a hand-selected spot off the main tourist trail, the expert guidance ensures you leave with more than just snapshots.
The “Women in Photography” Difference
The Women in Photography (WIP) pillar of our tours is designed to foster confidence without the pressure often found in mixed-gender groups. Many women find that their technical anxieties disappear when they’re in a nurturing environment. You’ll find “weekend companions” who quickly become lifelong friends while exploring the wild beauty of Aotearoa. Statistics from our past five years of operation show that 85% of our guests return for a second or third tour, proving that the connection made is just as valuable as the photos captured. It’s about building your technical skills in a way that feels natural and encouraging. You’ll spend your days discussing aperture and your evenings sharing stories over a glass of local Pinot Noir, making the entire experience feel seamless and deeply rewarding.
Choosing a personally escorted tour means you’re investing in your own peace of mind. Every detail is meticulously planned so you can focus entirely on your lens. From the moment you arrive until the final sunset, you’re in good hands. We ensure you’re at the right place at the precisely right time, capturing the South Island’s landscapes in ways that most travelers simply miss. It’s an opportunity to step away from the daily grind and reconnect with your creative self in one of the most beautiful places on Earth.
Your journey through the Mackenzie Basin and the rugged West Coast is about more than just checking off a list. It’s about mastering the 2026 weather patterns and finding those hidden, authentic perspectives that most tourists miss. You now have the roadmap to the best photo locations south island nz; however, the real magic happens when you stop worrying about the map and start focusing on the frame. Whether you’re chasing the Milky Way over Lake Tekapo or the misty peaks of Milford Sound, preparation is your most valuable piece of equipment.
Don’t let the logistics of a New Zealand road trip distract you from your creative flow. When you join a tour personally escorted by award-winning photographer Lesley Whyte, every detail is managed for you. We keep our group sizes small, often limited to just 6 or 8 photographers, to ensure you get the intimate, immersive learning you deserve. It’s a seamless adventure where the only thing you need to think about is the light. Join our next Women in Photography tour and experience a seamless adventure!
We can’t wait to see the incredible images you’ll create in the wild beauty of Aotearoa. #TravelWithLesleyWhyte #GirlsOnTheRoadAgain #ChathamIslandTours #WomenInPhotography #SartorialTravellersClub #VisitChathamIslands
Frequently Asked Questions
What is the absolute best month for photography in the South Island?
May is the absolute best month for photography because of the stable weather and vibrant autumn colours. In Central Otago, you’ll experience average temperatures of 11°C with crisp, clear skies that create perfect shooting conditions. This period offers a balance of soft light and manageable 9 hour days. You’ll capture the best photo locations south island nz has to offer without the harsh summer sun or the risk of winter road closures.
Do I need a professional camera, or is an iPhone enough for these locations?
An iPhone 15 Pro is sufficient for social media and small keepsakes, but a mirrorless camera is better for large-scale prints. If you want to print your work larger than A3 size, a full-frame sensor provides the necessary dynamic range for New Zealand’s high-contrast landscapes. Our workshops often include a mix of gear. We focus on composition and light rather than just expensive equipment, so don’t feel you need to upgrade before your journey.
How do I handle the sandflies while taking long exposures in Fiordland?
You should apply a high-strength repellent like Bushman Plus with 80% DEET before you leave your vehicle. These insects are most active at dawn and dusk in damp environments like Milford Sound. Wear long sleeves and trousers to cover as much skin as possible. If you’re setting up a 30 second exposure, keep your feet moving slightly. This constant movement prevents them from landing while your camera shutter is open.
Are these photography spots accessible for people with limited mobility?
Approximately 70% of the most iconic spots are accessible via sealed paths or very short, flat walks. Locations like the Church of the Good Shepherd and the Punakaiki Pancake Rocks feature paved tracks suitable for wheelchairs. We meticulously plan our routes to ensure everyone feels included in the experience. If a specific spot requires a steep hike, we always provide a beautiful, accessible alternative nearby so no one misses out on the magic.
Is it safe for solo female photographers to explore the South Island?
New Zealand is exceptionally safe for solo female travellers, ranking 4th on the 2023 Global Peace Index. You can feel confident exploring remote areas, though it’s wise to carry a Personal Locator Beacon in spots with no cell service. Our community provides a nurturing environment where you can connect with like-minded companions. This ensures you’re always looked after and supported while you’re out capturing the landscape.
What are the drone laws for photography in New Zealand National Parks?
Drones are strictly prohibited in all 13 National Parks unless you have a specific permit from the Department of Conservation. These permits cost NZ$95 plus GST for a non-commercial application and take 10 working days to process. Always check the AirShare app before you launch your craft. Many of the best photo locations south island nz are in protected areas where wildlife and visitor privacy are legally guarded.
How much time should I allocate for a full South Island photography circuit?
You should allocate 14 to 21 days to complete a comprehensive 2,500 kilometre photography circuit. This timeframe allows you to spend at least two nights in key areas like Wanaka and Mount Cook. Rushing through the landscape leads to missed opportunities when the weather changes. A longer 21 day itinerary gives you the flexibility to wait for the perfect light at Milford Sound or Aoraki without feeling stressed by a tight schedule.
What makes a “Women in Photography” tour different from a standard photo workshop?
These tours focus on a nurturing and collaborative environment specifically designed for female creators. We move at a slower pace to ensure everyone masters their technical settings without feeling rushed or intimidated. These journeys foster deep connections among 8 to 10 like-minded women in a supportive space. You’ll find the atmosphere is centered on shared inspiration and personal growth rather than just ticking locations off a list.
What if the biggest barrier to capturing breathtaking photos of New Zealand isn’t your camera, but the quiet fear that you’re not ‘good enough’ to join the experts? It’s a feeling many passionate photographers share. You see stunning images of Milford Sound or Aoraki/Mount Cook and dream of being there, but then the doubts creep in. Thoughts about complex gear, keeping up with a group, or traveling solo to remote places can feel overwhelming, stopping you before you even start.
This guide is here to dissolve those anxieties. We’ll show you how choosing the right landscape photography workshop NZ is less about technical perfection and more about finding a supportive, personally escorted adventure. You’ll discover how to find a seamless experience that builds your confidence, helps you create wall-worthy art, and connects you with a community of like-minded women. We’ll walk through everything from identifying your learning style and matching it to the right tutor to understanding what gear you *really* need, ensuring your 2026 trip is an unforgettable, meaningful journey.
Learn why a group size of 6-8 participants is the “sweet spot” and how to identify a tutor who is an exceptional teacher, not just a skilled photographer.
Discover the best North and South Island locations to capture New Zealand’s unique light, from the dramatic glacial lakes to hidden coastal seascapes.
Prepare with confidence by mastering the “less is more” gear philosophy for NZ and understanding what to expect physically on the trail.
Find out how a personally escorted, women-focused landscape photography workshop nz provides a uniquely supportive and thoughtfully planned creative adventure.
Why New Zealand is the Ultimate Canvas for Landscape Photography
Aotearoa New Zealand isn’t just a destination; it’s an immersive experience that challenges and inspires every photographer who frames its landscapes. What sets it apart is a rare combination of primordial beauty and a quality of light that feels almost supernatural. The air here, filtered by the vast Southern Ocean and free from the haze of northern hemisphere pollution, creates a crisp, clear light that photographers dream of. It sharpens every detail, deepens colours, and makes the “golden hour” a truly ethereal event.
This remarkable clarity illuminates a staggering diversity of scenery packed into two main islands. In a single journey, you can capture the raw, volcanic grandeur of the Tongariro Alpine Crossing, the ancient stillness of the West Coast’s podocarp rainforests, and the impossible turquoise of glacial-fed lakes like Pukaki and Tekapo. It’s this incredible geographical compression that makes an immersive landscape photography workshop nz so rewarding; you spend less time travelling and more time creating.
We believe 2026 is the perfect year to embark on this adventure. Since reopening its borders in 2022, New Zealand has doubled down on its commitment to sustainable, high-value tourism. By 2026, these new eco-tourism standards will be fully integrated, offering photographers improved access to remote regions with a lighter footprint. This approach is built on a long and proud history of environmental protection, and you can learn about the robust framework of the National Parks Act and other legislation that protects these wild places through resources on Conservation in New Zealand. This dedication ensures the landscapes you photograph remain pristine for generations to come.
Before you book, it’s vital to understand the difference between two common offerings:
A Photo Tour: Primarily focuses on logistics. The goal is to get you to the right place at the right time. It’s perfect if you’re confident in your skills and just need a guide.
A Photography Workshop: This is an educational experience. It’s about learning and growth. A workshop provides hands-on instruction in the field and critique sessions to help you develop your craft, from composition to post-processing.
The Emotional Connection of Landscape Photography
A truly great photograph captures more than just a scene; it captures a feeling. In New Zealand, the cultural concept of Manaakitanga (a deep expression of hospitality and reciprocal respect) enriches the workshop experience, creating a supportive space where you feel welcomed and cared for. This allows you to move beyond the classic “postcard shot” and connect with the soul of the land, listening to its stories and translating them into your images. Landscape photography is a mindful practice of observing and connecting with the quiet power of nature.
What to Expect from the NZ Climate in 2026
New Zealand’s weather is famously unpredictable. The local saying “four seasons in one day” is a reality, especially in alpine and coastal areas. While challenging, this creates opportunities for breathtakingly “moody” and dramatic images filled with atmosphere. Planning for golden hour also requires local knowledge; in summer, the last light might linger until 9:30 PM in Fiordland, while it fades an hour earlier in the far north. For this reason, safety is paramount. An expert guide isn’t just a tutor; they are your lifeline in the backcountry, trained to navigate the unpredictable terrain and weather, ensuring your adventure is both unforgettable and safe.
Essential Criteria for Choosing the Right NZ Workshop
Choosing a landscape photography workshop in NZ is an investment in your creative growth. With so many options, moving beyond glossy hero shots to evaluate the core value of a workshop is crucial. The right choice isn’t just about stunning locations; it’s about the quality of teaching, the seamlessness of the experience, and a supportive environment that lets your skills flourish.
A key factor is group size. Many workshops pack in 10-15 participants, which significantly dilutes the tutor’s attention. The sweet spot is a small group of 6 to 8 photographers. In a 3-hour sunset shoot, this smaller size can mean the difference between 10 minutes of rushed advice and 30 minutes of dedicated, one-on-one tuition. It’s in these moments that real learning happens.
Equally important is the tutor’s ability to teach, not just shoot. A world-class photographer isn’t always a world-class educator. Look for testimonials that praise the tutor’s patience, clarity, and passion for helping others succeed. A great mentor can articulate why a composition works and guide you to find your own vision, a skill far more valuable than simply copying their settings.
When comparing costs, look beyond the headline price. A seemingly cheaper self-catered workshop can quickly become more expensive. Consider the hidden costs for a 5-day trip:
Rental Car & Insurance: Approximately $600 NZD
Fuel: With petrol averaging $2.80 NZD per litre in 2024, travel between remote locations can add another $200-$300 NZD.
Meals & Accommodation: Budgeting for your own food and lodging adds significant time and expense.
An all-inclusive workshop, while appearing more expensive upfront, often provides better value by covering all transport, accommodation, and meals, creating a stress-free, immersive learning environment.
Finally, consider the workshop environment. The demand for women-only workshops is a clear indicator that many photographers thrive in a space built on shared experience and mutual support. Creating a safe, non-competitive atmosphere is essential for creative confidence, a trend we see accelerating into 2026.
The Logistics of a Seamless Adventure
A “fully escorted” tour removes the single biggest stressor of a photography trip: logistics. Navigating New Zealand’s winding rural roads and remote access points can be daunting. Having an expert handle all driving, accommodation, and meal planning allows you to focus entirely on your photography. The best itineraries are meticulously balanced, scheduling ample shooting time at golden hour while also building in crucial periods for rest and post-processing tuition. Tutors often consult the Department of Conservation (DOC) for the latest track conditions and access information, ensuring a safe and well-planned adventure.
Technical Support and Education
A quality landscape photography workshop nz doesn’t end when the camera is packed away. Look for workshops that offer dedicated post-processing sessions in Adobe Lightroom or Photoshop, as editing is at least 50% of the final image. Constructive critique sessions are also invaluable. In a supportive group, these aren’t about judgment; they are about seeing your work through fresh eyes and discovering new opportunities for growth. Whether you shoot with a new mirrorless camera, a trusted DSLR, or even a high-end smartphone, the teaching should be adaptable to your specific gear. Exploring our meticulously planned workshops is an excellent way to see how these essential criteria come together in a real-world adventure.
Top NZ Locations for Landscape Photography Workshops
New Zealand’s two main islands offer a breathtakingly diverse canvas for photographers. From the alpine giants of the south to the volcanic heart of the north, choosing where to go can be as challenging as mastering your camera settings. A great landscape photography workshop nz isn’t just about the tuition; it’s about being in the right place at the right time. We’ve curated a guide to the most compelling locations, blending iconic destinations with an untouched frontier that promises a truly unique adventure.
Chatham Islands: A Photographer’s Untouched Paradise
For photographers seeking the ultimate frontier in 2026, the Chatham Islands, or Rēkohu, are the holy grail. Located 800km east of mainland New Zealand, this remote archipelago offers a landscape that feels ancient and wild. Imagine capturing the haunting silhouettes of windswept kōpi (karaka) trees against a dramatic sky, or the rugged basalt columns of Ohira Bay. The photographic opportunities are raw and deeply moving. Beyond the landscapes, the islands are a sanctuary for rare birdlife, including the endemic Chatham Island shag. When photographing these precious species, it’s essential to follow the official wildlife photography guidelines from the Department of Conservation to ensure their safety and your success.
Critically, over 95% of the land on the Chathams is privately owned, making a personally escorted tour not just a luxury, but a necessity for access. Our Chatham Islands Tour: An Unforgettable Adventure Awaits handles all access permissions, allowing you to focus completely on your creative vision in this unforgettable place.
South Island Splendor: Mountains and Glaciers
No list of New Zealand’s photographic hotspots is complete without the majestic South Island. This is where you’ll find the classics: the deep, moody fiords of Fiordland, the turquoise lakes reflecting the peak of Aoraki/Mount Cook, and the solitary beauty of the Wanaka Tree. Workshops here often focus on mastering technical skills, like using long exposures to transform Milford Sound’s cascading waterfalls into silky ribbons or to smooth the relentless tide around the surreal Moeraki Boulders.
Looking ahead to 2026, the Southern Lights offer a spectacular opportunity. With Solar Cycle 25 reaching its peak activity period, the chances of witnessing a vibrant Aurora Australis from locations like Lake Tekapo or The Catlins are higher than they’ve been in over a decade. A good workshop will teach you the forecasting and camera settings needed to capture this celestial dance. Explore these iconic locations on one of our South Island Tours: Discover New Zealand’s Best.
While the South Island boasts alpine grandeur, don’t overlook the North’s unique character. A quality workshop might take you to the Coromandel Peninsula for golden-hour seascapes and hidden coves, or to Tongariro National Park, where volcanic plains and emerald lakes create an otherworldly, almost lunar, environment.
Preparation: Gear and Mindset for the New Zealand Wild
Joining a photography workshop is an investment in your creative growth. Arriving prepared, both with the right equipment and the right attitude, ensures you can fully immerse yourself in the adventure from the moment you land. New Zealand’s landscapes are raw and powerful, and its weather is famously unpredictable. Thoughtful preparation allows you to focus not on your gear, but on the incredible scenes unfolding before you.
We believe in a “less is more” philosophy. You don’t need every piece of equipment ever made; you need the right tools for the job. For New Zealand’s vast landscapes, this typically means a versatile lens range. A wide-angle (like a 16-35mm) is perfect for capturing grand vistas, a standard zoom (24-70mm) is your all-purpose storyteller, and a telephoto (70-200mm) helps isolate dramatic mountain peaks or distant details. Beyond the camera, physical readiness is key. Our “small group walking” often involves navigating well-formed but uneven Department of Conservation (DOC) tracks, sometimes with short, steep sections. You don’t need to be a mountaineer, but comfortable, broken-in hiking boots and a reasonable level of fitness will make the experience far more enjoyable. Finally, dressing for the elements is non-negotiable. We swear by the three-layer system: a merino wool base layer for warmth and moisture-wicking, a fleece mid-layer for insulation, and a fully waterproof and windproof outer shell to protect you from the elements.
The Essential Photography Kit List
Your camera bag should be a source of confidence, not a burden. Here are the absolute essentials we recommend for any landscape photography workshop nz:
A Sturdy Tripod: New Zealand sits in the path of the “Roaring Forties” winds. A lightweight, flimsy tripod simply won’t do. Stability is non-negotiable for sharp, long-exposure images of our iconic coastlines and waterfalls.
Filters 101: A Circular Polarizer is your best friend for managing reflections on water and deepening the blue in the sky. A 6-stop or 10-stop Neutral Density (ND) filter is also invaluable for creating that beautiful, silky effect on flowing water.
Backup Strategy: In remote locations, a reliable file management system is crucial. We recommend bringing two portable SSD drives and a laptop. Each evening, back up your memory cards to both drives for complete peace of mind.
Mindset and Community
The most important piece of kit you bring isn’t in your camera bag; it’s your mindset. It’s completely normal to feel a touch of “imposter syndrome” when shooting alongside others, but a supportive workshop environment is designed to dissolve those anxieties. It’s a space for shared learning, not competition. Traveling with like-minded companions who share your passion means no one will rush you when you’re waiting for that perfect light. This shared experience transforms a simple trip into a meaningful journey, allowing you to shift from just “taking pictures” to intentionally “making images” that tell a story and convey emotion.
The Women in Photography Difference: Why We Travel Differently
Choosing a photography tour is about more than just the destination; it’s about the experience, the community, and the confidence you build. At Travel With Lesley Whyte, we’ve created something truly different. Our philosophy is rooted in creating a supportive, nurturing environment where your creativity can flourish without pressure or competition. These aren’t just tours; they are meaningful, personally escorted journeys designed to inspire.
Led by award-winning photographer Lesley Whyte, every single detail is thoughtfully planned and personally managed. From the moment you book, you become part of a community. Many of our guests arrive with initial anxieties about their skill level or travelling with a new group, but as past attendees have shared, those worries “melt away” upon meeting the team. We believe that when you feel safe and supported, you create your best work. This approach is the heart of our Women in Photography: Tours to Inspire Your Creativity, where connection is just as important as composition.
Bespoke and Authentic Experiences
We take you far beyond the crowded tourist lookouts. Our itineraries are built on years of local knowledge, giving you access to hand-selected locations and private properties that others simply can’t reach. We connect with local experts, from iwi guides who share deep cultural stories to conservationists who reveal the secrets of the land. It’s an immersive approach that enriches your photography and your understanding of Aotearoa. For those who believe travel should be done in style, our Sartorial Travellers Club integrates comfort, fine food, and creative camaraderie. Our “weekend companions” often tell us they leave not just with better photos, but with a renewed sense of creative purpose and lifelong friends.
Booking Your 2026 Adventure
Our commitment to a personal, high-quality experience means our groups are intentionally small, often capped at just 8 photographers. This ensures everyone gets dedicated one-on-one tuition and space to create. Spots for our 2026 adventures fill up quickly, so we encourage you to plan ahead to secure your place. For our cherished repeat clients, the Wanderlust Travellers Club offers priority booking notifications and exclusive perks on future trips. Don’t let another year pass you by. Join us for a seamless, inspiring landscape photography workshop nz and discover the difference for yourself.
New Zealand’s landscapes are waiting for your unique vision. As you’ve seen, choosing the right workshop is the first step in transforming that vision into unforgettable art. The best experience isn’t just about stunning locations; it’s found in a supportive community with mentors who are truly invested in your growth. Finding the perfect landscape photography workshop nz means matching your goals with an environment where you feel inspired and safe to create.
If you’re ready for a seamless adventure designed by women, for women, our approach is different. Our 2026 journeys are personally escorted by award-winning photography mentors in intimate groups of a maximum of 8 women. This guarantees you get the 1-on-1 time you deserve in a 100% supportive and inclusive learning environment. It’s time to travel differently.
Do I need a professional camera to join a landscape photography workshop in NZ?
No, you don’t need a professional camera to join. While a DSLR or mirrorless camera with manual controls will help you get the most out of the tuition, our workshops welcome photographers with any equipment. We believe it’s about the creative eye, not just the gear. Our tutors can help you capture stunning images even with a high-end smartphone, focusing on composition and light to elevate your photography, whatever you’re shooting with.
What is the best time of year for a photography tour in New Zealand?
The “best” time truly depends on the scenery you want to capture. Autumn, from March to May, offers incredible golden light and vibrant foliage, especially around Central Otago. Winter, from June to August, provides dramatic snow-capped peaks in the Southern Alps. For wildflowers like the famous lupins and lush green landscapes, spring from September to November is ideal. Each season presents a unique and unforgettable photographic adventure.
Are these workshops suitable for solo female travelers?
Absolutely. Our workshops are a fantastic and safe option for solo female travelers. In fact, on our dedicated Women in Photography tours, over 70% of our guests join on their own. We foster a supportive, welcoming, and inclusive community where you can connect with like-minded women. Your initial anxieties will melt away as you share an incredible experience with new friends in a secure and personally escorted group environment.
How much walking is involved in a typical NZ photography workshop?
Most walks on our tours are designed to be accessible, not arduous. A typical outing involves walking between 1 and 4 kilometres on well-maintained tracks to reach stunning viewpoints. The focus is always on the photography, so we take a relaxed pace with plenty of stops. A moderate level of fitness is all that’s required to comfortably enjoy every location we visit on a landscape photography workshop NZ.
What happens if the weather is bad during the workshop?
Bad weather often creates the most dramatic and moody photographic opportunities. We embrace the conditions, as stormy skies and rain-slicked landscapes can lead to powerful images. If conditions become unsafe, we always have a backup plan. This could include visiting a more sheltered location, like a dense native forest, or using the time for an invaluable indoor session on editing techniques and post-processing workflow in a warm, dry space.
Is travel insurance required for NZ photography tours?
Yes, comprehensive travel insurance is mandatory for all our workshop participants. It’s essential for your peace of mind and protection. Your policy must provide coverage for medical emergencies, trip cancellations or interruptions, and loss or damage to your luggage and camera equipment. We recommend a minimum medical coverage of NZ$1,000,000. This ensures you’re fully protected against any unforeseen events during your seamless adventure with us.
Can beginners join the Women in Photography tours?
Yes, beginners are warmly welcomed on our Women in Photography tours. These experiences are specifically designed to inspire, educate, and connect women at every skill level, from those picking up a camera for the first time to seasoned photographers. Our expert tutors provide personalised, one-on-one guidance in a supportive and encouraging environment, ensuring everyone feels comfortable and leaves with new skills and confidence.
Are flights included in the workshop price?
No, flights to and from the workshop’s designated start and end point are not included in the price. This gives you the flexibility to book from your home city and perhaps extend your stay in New Zealand. The workshop fee covers all your ground transport from the moment we meet, your accommodation, expert tuition, and any meals or entry fees specified in the tour itinerary. Every detail is thoughtfully planned for you.
Dreaming of capturing the magic of the Coromandel, but tired of sifting through the same crowded hotspots online? It can be overwhelming to plan a meaningful photography trip when you’re unsure of the best tides for that perfect long exposure or where to find the hidden coves that only locals seem to know about. The fear of missing out on a truly unique shot is real, turning what should be an exciting creative escape into a logistical headache.
That’s precisely why we’ve created this guide. Think of it as your personally escorted map to an unforgettable photographic adventure. We’re moving beyond the obvious to share a curated collection of the peninsula’s most breathtaking locations. This isn’t just a list; it’s a complete photographer’s companion, packed with insider tips on the best light, ideal tide times, and the gear you’ll need for each unique spot. We’ll help you sidestep the crowds and discover the soul of the region, empowering you with the confidence and inspiration to create a portfolio of images that truly tells its story. Your seamless Coromandel photography journey starts right here.
Preparing for Your Coromandel Photo Adventure: Gear & Pro Tips
For any landscape photographer, the Coromandel Peninsula is an unforgettable canvas of dramatic coastlines, secluded coves, and lush native bush. Its raw, unspoiled beauty offers endless opportunities to create breathtaking images. However, capturing the true magic of this region requires more than just a good eye; it demands thoughtful preparation. The key to a seamless and successful photography adventure here lies in planning for the unique coastal environment, from its powerful tides to its ever-changing weather.
The light, especially during the ‘golden hours’ of sunrise and sunset, is simply sublime, casting a warm, ethereal glow across iconic locations like Cathedral Cove and New Chums Beach. To make the most of these fleeting moments, it’s vital to check road conditions before heading to more remote spots, as some access roads can be unsealed and challenging.
Essential Camera Gear for Coromandel Landscapes
Packing the right equipment will ensure you’re ready for any scene the Coromandel presents. Here’s a checklist of non-negotiable items for your camera bag:
A Sturdy Tripod: Absolutely essential for capturing sharp, long-exposure shots of sunrises, sunsets, and silky smooth water.
Wide-Angle Lens (e.g., 16-35mm): Perfect for those sweeping seascapes and capturing the grand scale of the coastline.
Telephoto Lens (e.g., 70-200mm): Ideal for compressing distant headlands, isolating details in the landscape, or capturing birdlife.
Filters: A circular polarizer is a must-have to cut glare on the water and deepen the blue of the sky. ND (Neutral Density) filters will allow you to create dreamy long exposures, even in brighter conditions.
Insider Tips Before You Go
A little local knowledge goes a long way. These practical tips will help you navigate the peninsula with confidence and care:
Check the Tides: Many iconic locations, including Cathedral Cove’s archway and Hot Water Beach, are only accessible at low tide. Always check the tide times before you set out.
Download Offline Maps: Mobile phone service can be unreliable or non-existent in many parts of the peninsula. Download maps of the area to your phone or GPS device.
Dress in Layers: Coastal weather can shift in an instant. Packing layers, including a waterproof and windproof jacket, will keep you comfortable.
Protect Your Gear: Sea spray is inevitable. Bring plenty of microfiber lens cloths and a protective rain cover or bag for your camera to shield it from corrosive salt and moisture.
The Icons of the East Coast: Capturing Sunrise & Seascapes
There is something truly magical about witnessing the first light of day on the east coast of the Coromandel Peninsula. As the sun emerges from the Pacific, it casts a warm, golden glow across the dramatic coastline, illuminating the intricate details of sea stacks, white cliffs, and pristine beaches. This daily spectacle offers an unforgettable opportunity for photographers and travellers alike to capture the region’s raw beauty. The most iconic locations can become bustling hubs of activity, so we always recommend a very early start. Preparing your gear the night before ensures a seamless morning adventure, allowing you to arrive in the pre-dawn quiet and find the perfect spot.
Cathedral Cove (Te Whanganui-A-Hei)
Arguably New Zealand’s most famous coastal vista, Cathedral Cove is a photographer’s dream. For the most compelling images, plan your visit for sunrise during a low to mid-tide, which reveals shimmering reflections on the wet sand. The classic composition is to shoot through the magnificent rock arch towards the Te Hoho Rock sea stack. To manage the high contrast between the bright sky and dark shadows of the arch, use a sturdy tripod and bracket your exposures. Remember to factor in the 45-minute walk to the cove; it’s a beautiful journey in itself and part of this immersive coromandel experience.
Hot Water Beach
A short drive from Hahei, Hot Water Beach offers a unique photographic subject: natural steam rising from the sand as it meets the cool ocean waves. The best time to experience this geothermal wonder is within two hours on either side of low tide. While the wider scene is captivating, don’t forget to look down. Capturing close-up details of the hot water bubbling through the sand can create wonderfully abstract images. Your safety is paramount, so always be mindful of the incoming tide and be cautious of strong ocean currents.
Hahei Beach & Offshore Islands
While many flock to Cathedral Cove, the sweeping curve of Hahei Beach itself provides a stunning and often quieter alternative for sunrise. The soft morning light beautifully accentuates the beach’s elegant arc and the pink-tinged sand. This is an excellent location to use a longer lens to compress the perspective and bring the nearby offshore islands into focus, creating a layered and compelling seascape. During the summer months (December-January), look for flowering pohutukawa trees along the foreshore to use as a natural frame for your shots. Before you head out, it’s always wise to check the latest local conditions and access information from official sources like the Coromandel conservation areas website.
West Coast Wonders: Golden Sunsets & Rugged Coastlines
While the east coast is famed for its white-sand beaches, the west coast of the Coromandel offers a completely different, yet equally captivating, adventure. Here, the waters of the Firth of Thames are calmer, the coastline feels more rugged, and the sunsets are simply unforgettable. This is a journey back in time, winding past historic gold mining towns that lend a unique character to the landscape. For photographers, this side of the peninsula is a dream, coming alive in the soft, warm light of the afternoon and golden hour.
The Thames Coast Road
Prepare for one of New Zealand’s most scenic drives. The Thames Coast Road is a target-rich environment for photographers, with countless safe pull-offs offering breathtaking views. Keep your camera ready for the iconic, gnarled pohutukawa trees that cling tenaciously to the cliffs, their crimson flowers a stunning contrast against the blue sea in summer. The best light is almost always in the last two hours before sunset, when the sky ignites in hues of gold and orange.
Photography Tip: Use a slow shutter speed (and a tripod!) to transform the gentle waves into a soft, misty canvas, adding a touch of magic and serenity to your coastal images.
Coromandel Town & The Driving Creek Railway
Nestled on the coast, Coromandel Town is brimming with charm, its streets lined with beautifully preserved historic buildings and quirky art galleries. It’s a wonderful place to explore on foot, but for a truly unique perspective, a trip on the Driving Creek Railway is an immersive experience. This narrow-gauge mountain railway climbs through regenerating native forest, offering incredible vantage points you can’t get anywhere else. For more details on attractions in the area, the Official guide to The Coromandel is an excellent resource. The journey is dotted with colourful and whimsical art installations, making it a fantastic photographic adventure, even on a cloudy day when the soft light enriches the vibrant greens of the forest.
Beyond the Beaches: Hidden Gems & Inland Beauty
While the golden sands are captivating, the true heart of the Coromandel beats within its lush, green interior. To truly connect with this region is to venture inland, where ancient forests, cascading waterfalls, and breathtaking lookouts offer a different kind of magic. This is where you’ll find unforgettable adventures far from the summer crowds, creating memories that are both personal and profound.
The 309 Road Kauri Grove
The winding 309 Road is an adventure in itself, leading you to a place of quiet reverence: the Kauri Grove. Standing beneath these forest giants is a humbling experience. Remember to meticulously clean your footwear at the designated hygiene stations; protecting these taonga (treasures) from kauri dieback is our shared responsibility. For photographers, an overcast day provides soft, even light, perfect for using a wide-angle lens to capture the immense scale of the trees and the rich textures of the forest floor.
Waiau Falls & The Waterworks
Just a short walk from the road, Waiau Falls is a picture-perfect cascade tumbling into a serene pool. It’s an easily accessible spot for a moment of peace and a classic photo opportunity-use a tripod and ND filter to create that beautiful, silky effect on the moving water. For a complete change of pace, the nearby Waterworks is a celebration of Kiwi ingenuity. This quirky theme park, powered entirely by water, is filled with whimsical contraptions and vibrant colour, making it a fantastic and fun-filled stop for all ages.
Castle Rock Lookout
For those with a spirit of adventure and a good pair of hiking boots, the climb to Castle Rock is an absolute must. This challenging trek rewards you with one of the most spectacular 360-degree panoramic views in the Coromandel. You can see from coast to coast, a breathtaking tapestry of forest, farmland, and sea. The golden light of late afternoon is magical here, though a sunrise mission is truly unforgettable. A telephoto lens is perfect for isolating distant islands and coastline details from the summit.
Exploring these inland gems reveals a richer, more diverse narrative of this beloved region. It’s about finding those quiet moments and grand vistas that make a journey truly meaningful. If you’re inspired to discover the hidden corners of New Zealand with a group of like-minded adventurers, explore the personally escorted journeys at travelwithlesleywhyte.com.
Putting It All Together: A 3-Day Coromandel Photography Itinerary
The Coromandel Peninsula is a photographer’s dream, but its winding roads and tidal attractions require thoughtful planning to truly capture its magic. To help you visualise the possibilities, we’ve crafted a sample 3-day itinerary that balances iconic locations with hidden gems. Think of this as a starting point for your own unforgettable adventure-a way to connect the dots and make the most of every moment behind the lens.
Day 1: West Coast Sunsets
Your journey begins as you arrive via Thames, the historic gateway to the peninsula. We suggest taking the afternoon to drive the breathtaking western coast road. The light here is spectacular as the sun begins to lower, casting a warm, golden glow across the pōhutukawa-lined shores and tranquil bays. Find a perfect spot to capture the sunset before settling in for the night in charming Coromandel Town or a nearby coastal hideaway.
Day 2: Inland Exploration & East Coast Arrival
Dedicate your morning to discovering the creative spirit of Coromandel Town and the quirky character of the 309 Road, with its resident pigs and lush native forest. In the afternoon, traverse the peninsula to the east coast. After checking into your accommodation in a place like Hahei or Whitianga, use the evening to scout your sunrise location. Understanding the tides and compositions ahead of time is the key to a seamless and successful morning shoot.
Day 3: Classic East Coast Sunrise
An early start is rewarded with the day’s main event: sunrise at the world-famous Cathedral Cove. Capturing the first light filtering through the majestic rock arch is a quintessential New Zealand photographic experience. Afterwards, as the day-trippers begin to arrive, you can relax on the golden sands of Hahei Beach or dig your own natural spa at Hot Water Beach (tide permitting), reflecting on a picture-perfect morning.
A well-planned trip like this ensures you’re in the right place at the right time, turning a good holiday into a truly meaningful photographic journey. If you’d prefer to focus entirely on your creativity while every detail is thoughtfully planned for you, why not join a personally escorted tour? Explore our photography tours!
Your Unforgettable Coromandel Story Starts Here
The Coromandel Peninsula truly is a photographer’s paradise, a landscape rich with creative potential at every turn. From the iconic dawn light painting the arches of Cathedral Cove to the dramatic, golden sunsets that set the western coastline ablaze, its beauty is boundless. We’ve explored the must-have shots and the hidden gems, but the real secret is to simply immerse yourself in the journey. With its diverse scenery, the Coromandel offers an unforgettable canvas for every photographer ready to tell a visual story.
Feeling inspired? If you’re ready to elevate your craft and capture this breathtaking scenery without the stress of logistics, we warmly invite you to join a seamless, fully-escorted photography adventure with us! Imagine being personally escorted by an award-winning photographer, learning and growing in a supportive, small-group setting that allows for personalised tuition. Every detail is thoughtfully planned and all logistics are handled, freeing you to focus completely on your creative vision. Your next great shot is waiting.
Frequently Asked Questions
When is the best time of year to photograph the Coromandel?
For the best photographic light, we recommend the shoulder seasons of autumn (March-May) and spring (September-November). During these months, the light is softer, the crowds are smaller, and you can capture beautiful sunrises and sunsets without harsh midday glare. While summer offers vibrant pohutukawa blooms, winter provides an opportunity for dramatic, moody seascapes for those seeking a more atmospheric and deeply moving shot. Every season offers a unique, unforgettable perspective.
Do I need a 4WD vehicle to access these photo spots?
For the most popular and iconic photography locations like Hahei, Hot Water Beach, and the main roads to Whitianga, a standard 2WD vehicle is perfectly sufficient. The main highways are sealed and well-maintained, ensuring a seamless journey. A 4WD might offer more confidence on some of the peninsula’s gravel backroads if you plan a deeper adventure, but it is certainly not a requirement for a rewarding photography trip to the main sights.
How much walking is required for places like Cathedral Cove?
The main walking track to Cathedral Cove from the visitor car park in Hahei is a beautiful but hilly 2.5km journey that takes approximately 45 minutes each way. The path is well-formed and includes sections of boardwalk and stairs, with stunning coastal views along the way. We recommend wearing comfortable shoes and carrying water. The effort is a wonderful part of the experience, culminating in the unforgettable view that awaits you at the cove.
Are drones allowed for photography in the Coromandel?
Drone usage in the Coromandel is restricted, particularly in protected areas. Most of the iconic coastline, including Cathedral Cove, is managed by the Department of Conservation (DOC), where flying a drone requires a specific permit. We strongly advise checking the official DOC website and local council bylaws before your trip. Flying without permission can result in significant fines, so it’s essential to plan ahead to ensure you respect these precious conservation areas.
What are some tips for dealing with sea spray on my camera gear?
A lens hood is your first line of defence and helps block a surprising amount of spray. Always keep a high-quality, clean microfiber cloth in an easily accessible pocket to gently wipe your lens. For added peace of mind, a clear UV filter can protect your lens’s front element. After your shoot, it’s wise to wipe down your entire camera and lens body with a cloth lightly dampened with fresh water to remove corrosive salt residue.
Is it safe to leave camera gear in the car at trailheads?
We strongly advise against leaving any camera gear visible in your car. To ensure a worry-free adventure, your best and safest option is to carry your gear with you in a comfortable camera backpack. If you must leave something behind, ensure it is completely hidden from view in the boot or glove compartment *before* you arrive at the car park. Never let anyone see you stowing your valuables, as this can draw unwanted attention.