How to Choose a Photography Tour: The Ultimate 2026 Guide for Creative Travellers

How to Choose a Photography Tour: The Ultimate 2026 Guide for Creative Travellers

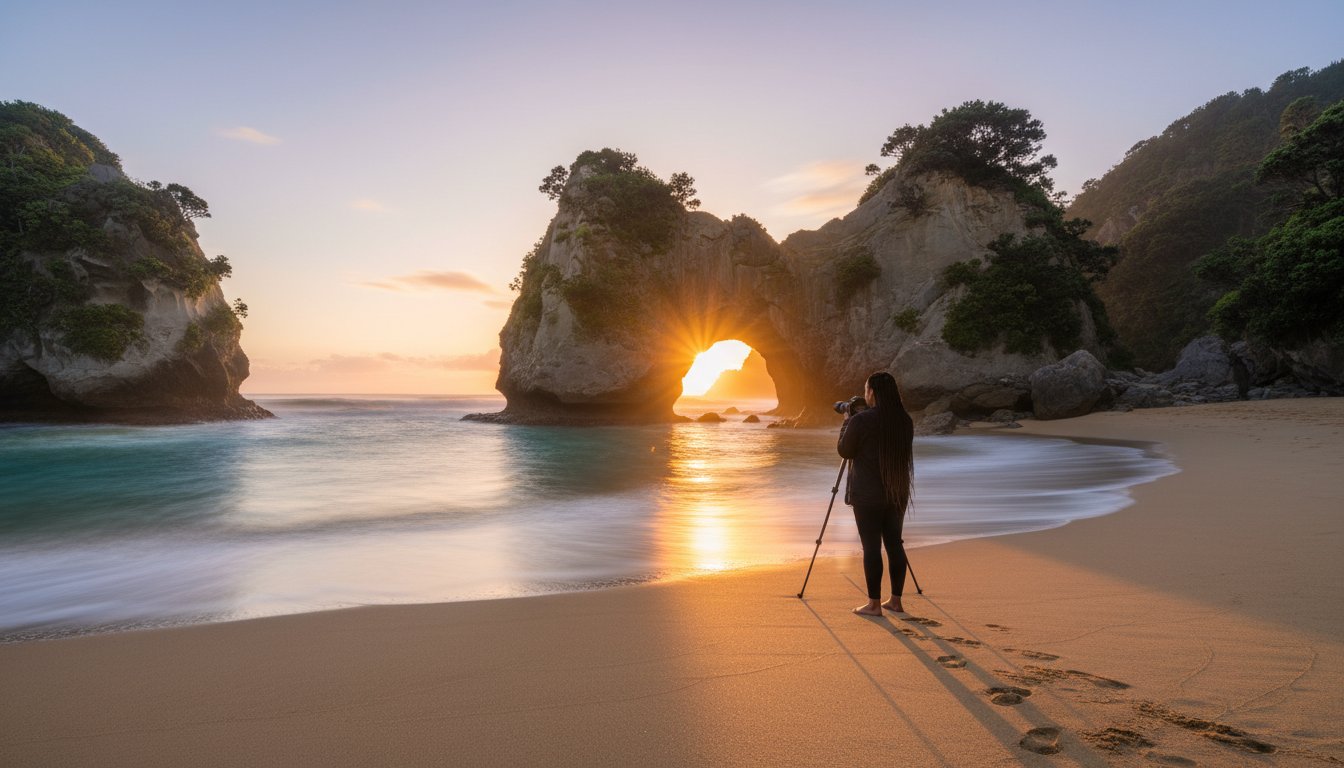
Imagine standing on a rugged New Zealand coastline at 5:00 AM, fumbling with your camera and worrying if you’re slowing down the group. It’s a common feeling; many of the 500+ women we’ve hosted share that “not good enough” anxiety or fear a frantic, exhausting itinerary. It’s natural to want a journey that respects your pace and nurtures your talent. Learning how to choose a photography tour is the vital first step toward a seamless adventure where your confidence can finally bloom.

This 2026 guide will show you how to find a journey that aligns with your skill level and your soul, ensuring your next escape is both stress-free and creatively transformative. We’ll explore the five essential pillars of mentor evaluation, group dynamics, and itinerary pacing to help you book with total confidence. By the end, you’ll be ready to capture an exceptional portfolio alongside a community of like-minded friends who celebrate your growth.

Key Takeaways

  • Distinguish between technical workshops and immersive expeditions to ensure your travel pace aligns perfectly with your creative aspirations.
  • Learn to identify mentors who prioritise your personal skill development and confidence over capturing their own professional “hero shots.”
  • Master how to choose a photography tour by evaluating itineraries for “slow travel” principles and dedicated Golden Hour sessions.
  • Discover how small, supportive group dynamics create a nurturing environment where every guest feels empowered and personally escorted.
  • Use our essential checklist to verify all-inclusive NZ$ costs and inclusions for a seamless, worry-free adventure. #TravelWithLesleyWhyte #GirlsOnTheRoadAgain #WomenInPhotography #SartorialTravellersClub #VisitChathamIslands

Table of Contents

Understanding the Landscape: Photography Workshops vs. Tours vs. Expeditions

Selecting the right travel experience is the first step toward capturing portfolio-defining shots. The photography travel market has grown by 12% annually over the last five years, leading to a crowded marketplace where terms are often used interchangeably. To master how to choose a photography tour, you first need to distinguish between the three primary formats: workshops, tours, and expeditions. Each offers a different balance of instruction, travel, and physical demand.

A photography workshop is essentially a classroom in the field. These are often based in a single location to minimize travel time and maximize “teaching moments.” You can expect intensive sessions on manual settings, composition, and post-processing software. If you want to spend four hours a day learning the nuances of Adobe Lightroom, a workshop is your best fit. Conversely, photography tours focus on movement and variety. These journeys take you through multiple regions, providing a diverse range of subjects from local culture to sweeping landscapes. They are designed for the creator who wants to build a broad Travel photography portfolio while enjoying a curated travel experience. Finally, expeditions are rugged adventures. These are often off-the-beaten-path journeys to remote areas like the polar regions or the outer reaches of the Chatham Islands, where the schedule is dictated by weather and light rather than a fixed itinerary.

Which Format Matches Your Creative Goals?

Your choice depends on whether you value technical tuition or “shutter time.” If you’re a beginner, you might prefer a workshop’s structured guidance. Experienced shooters often choose tours to access unique vantage points without the burden of planning. Consider your comfort level too. Some tours offer luxury boutique hotels, while expeditions might involve remote lodges or shared cabins. Be honest about your fitness. An expedition might require hiking five kilometers with 10kg of gear, whereas a tour often uses private transport to reach the best spots.

The Role of the ‘Fully Escorted’ Experience

Logistics can be the loudest “noise” during travel. Dealing with transport, bookings, and local permits eats into your creative energy. A personally escorted tour removes this friction entirely. Having a dedicated host means every detail is managed, letting you focus 100% on your viewfinder. This is the primary reason many photographers move away from self-drive trips. When you don’t have to worry about where the next meal is coming from or how to navigate a foreign road system, your creativity can actually breathe. It transforms a stressful trip into a seamless adventure where the only thing you need to capture is the light.

#TravelWithLesleyWhyte #GirlsOnTheRoadAgain #ChathamIslandTours #WomenInPhotography #SartorialTravellersClub #VisitChathamIslands

How to Evaluate Your Photography Mentor: Beyond the Portfolio

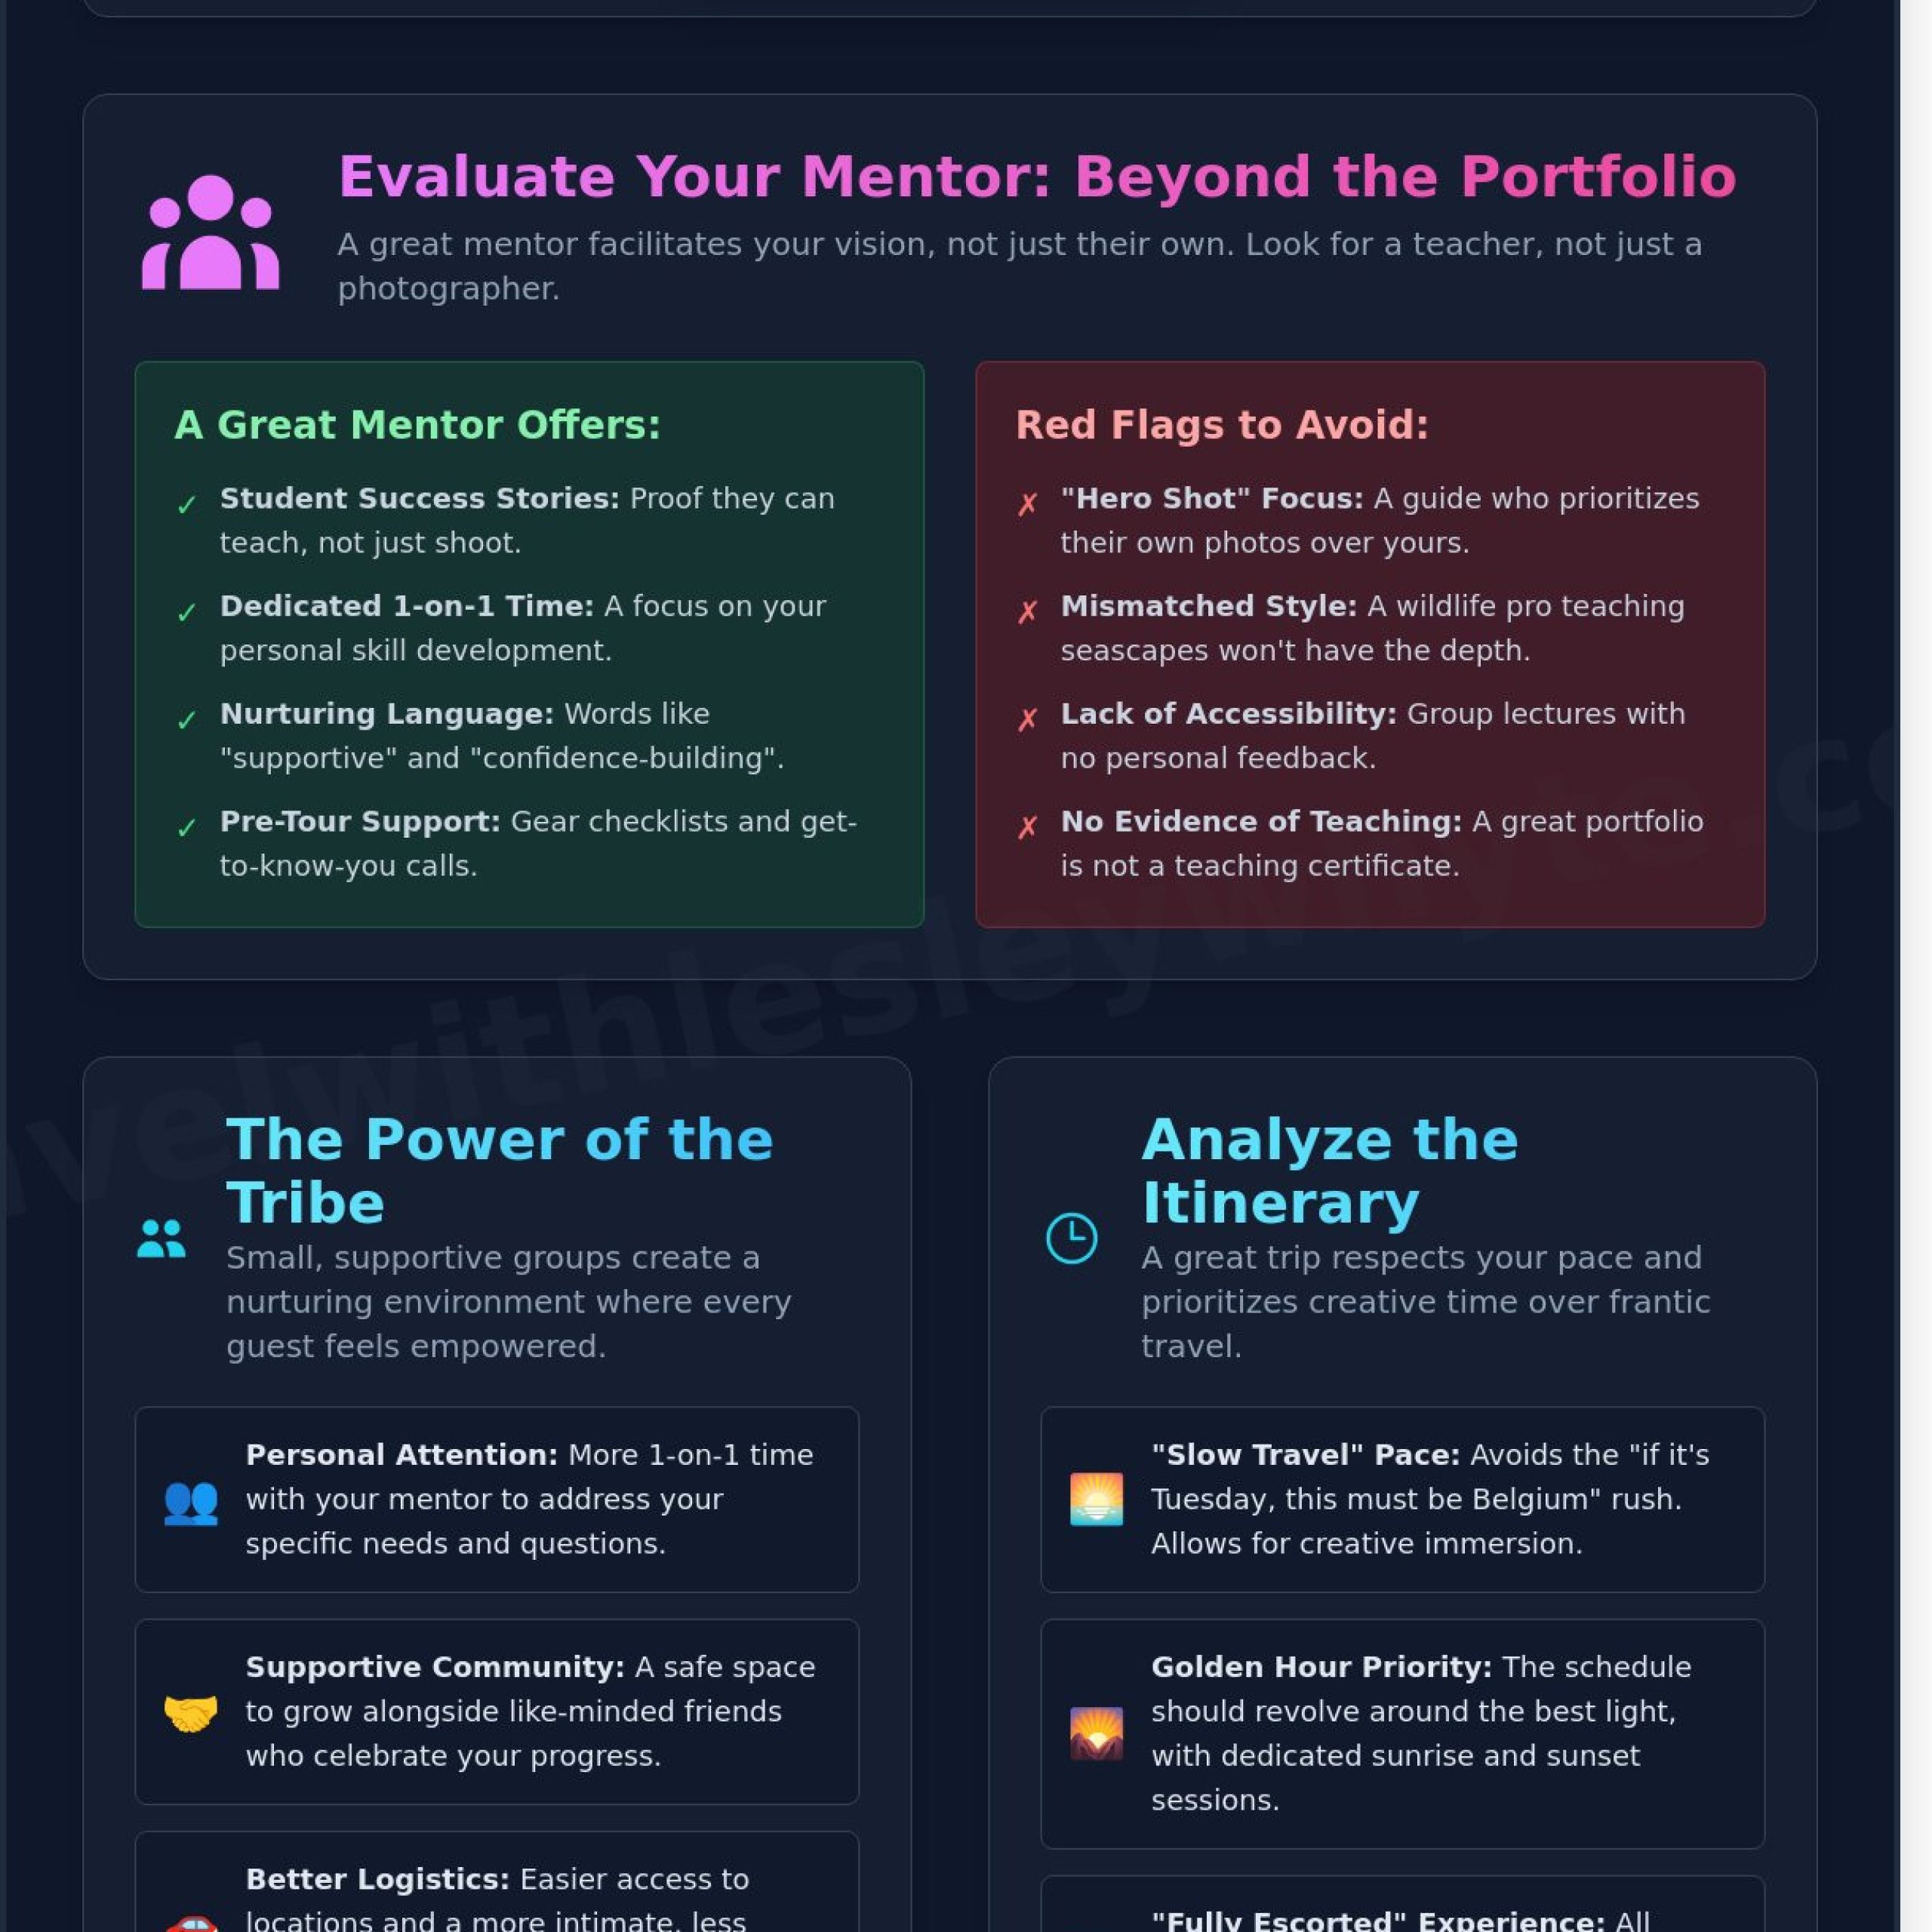
A stunning portfolio is a fantastic starting point, but it doesn’t guarantee a rewarding learning experience. When you’re figuring out how to choose a photography tour, you need to look past the “hero shots” on a website. A world-class photographer might be brilliant at capturing light, yet they may struggle to explain the technical steps they took to achieve that result. You want a mentor who puts their camera away to look over your shoulder. If a guide is constantly setting up their own tripod while the light is peaking, they aren’t mentoring; they’re simply taking you on a guided shoot while focusing on their own gallery.

Search for evidence of student success rather than just the mentor’s accolades. A mentor’s gallery tells you what they can do, but a diverse range of student testimonials and photos shows you what they can help you achieve. It’s also vital to ensure their specific shooting style matches your personal goals. If you’re passionate about long-exposure seascapes, a wildlife specialist won’t provide the technical depth you need to master your filters and shutter speeds. A mentor should be a facilitator of your vision, not just a mirror of their own.

Assessing Teaching Philosophy and Accessibility

Check if the itinerary includes dedicated 1-on-1 time in the field or if it’s mostly group lectures. Look for nurturing language in tour descriptions, like “supportive environment” or “building confidence,” which signals a mentor who prioritizes your individual growth. High-quality tours often provide pre-tour support, such as gear checklists or “get to know you” video calls. These touchpoints ensure you arrive prepared and comfortable, knowing your mentor understands your current skill level and what you hope to learn.

The Importance of Local Expertise

Deep local roots are essential for an authentic experience that goes beyond the standard tourist trail. A mentor who knows the New Zealand landscape intimately can find hidden gems that Google Maps simply misses. When the unpredictable West Coast rain sets in, a local expert knows exactly how to pivot the itinerary to a sheltered forest or a moody coastal spot that thrives in overcast light. This level of adaptability is a key factor in how to choose a photography tour that delivers results regardless of the conditions. This is why Women in Photography mentors are so valuable; they understand the nuances of the NZ terrain and how to work with our unique, fast-changing light conditions.

If you’re ready to learn in a supportive community where your progress comes first, consider joining a personally escorted photography adventure tailored for your specific skill level.

#TravelWithLesleyWhyte #GirlsOnTheRoadAgain #ChathamIslandTours #WomenInPhotography #SartorialTravellersClub #VisitChathamIslands

How to Choose a Photography Tour: The Ultimate 2026 Guide for Creative Travellers

The Power of the Tribe: Why Group Dynamics and Size Matter

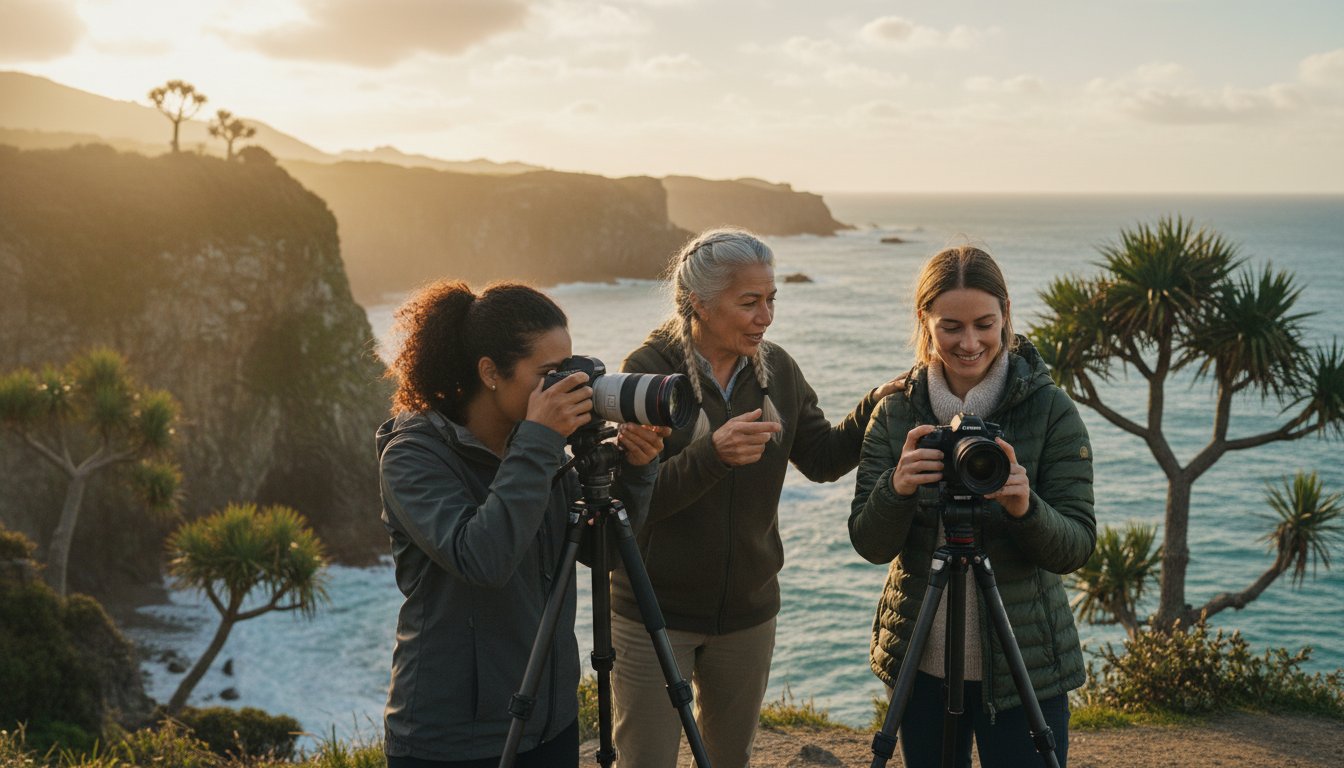
Group size is often the most overlooked factor when you’re learning how to choose a photography tour. It’s the difference between a crowded workshop and a bespoke masterclass. A small group, usually capped at 6 to 8 people, ensures you never have to fight for a tripod spot at sunrise. This intimate setting fosters a supportive environment where “skill anxiety” or imposter syndrome quickly evaporates. When you’re surrounded by a community of like-minded travellers, the focus shifts from competition to connection. These tours aren’t just about the photos; they’re about the lifelong friendships formed over shared sunsets and early morning coffee.

The Small Group Advantage

Small groups offer a level of agility that large tours can’t match. We use flexible transport that reaches remote New Zealand locations where big buses are prohibited. This means more time shooting and less time loading gear. The biggest benefit is the individualized attention from your tutor. In a small setting, your mentor can spend quality time reviewing your back-of-camera shots and refining your technique in real time. A lower photographer-to-mentor ratio, ideally around 6:1, accelerates your learning curve because you aren’t waiting in line for advice. You get the specific guidance you need exactly when the light is perfect.

Creating a Safe Space for Solo Travellers

Traveling alone for the first time can feel daunting, especially when carrying expensive gear. We design our experiences to provide a “soft landing” for solo adventurers. These Women’s Retreats NZ prioritize the safety and comfort of women traveling independently. The host plays a vital role in facilitating group bonding, ensuring no one feels like an outsider. Inclusive evening meals are a cornerstone of the experience. These dinners are where the group reflects on the day’s successes and shares tips in a relaxed, non-judgmental atmosphere. It’s about feeling better looked after and knowing you’re in good hands from the moment you arrive.

When you consider how to choose a photography tour, look for a host who values the “human” element as much as the technical one. A personally escorted journey ensures every detail is meticulously planned, leaving you free to focus on your creative growth. You’ll return home not just with a full memory card, but with a renewed sense of confidence and a new circle of friends.

#TravelWithLesleyWhyte #GirlsOnTheRoadAgain #ChathamIslandTours #WomenInPhotography #SartorialTravellersClub #VisitChathamIslands

Analysing the Itinerary: Pace, Flexibility, and Iconic Locations

Understanding how to choose a photography tour requires looking past the glossy brochures and scrutinising the daily schedule. A “packed” itinerary is often the greatest hurdle to capturing professional-grade images. If you’re moving to a new hotel every single morning, you’re spending more time packing a suitcase than waiting for the golden light to hit a mountain peak. High-quality tours embrace “slow travel,” ensuring you have the time to actually see what’s in front of your lens.

Pacing for Creativity

Look for tours that offer two or three nights in a single location. This approach gives you multiple chances at the same landscape; if the clouds roll in on day one, you still have day two. This is vital at iconic spots like Milford Sound, where the mist can transform the Fiordland scenery in minutes. Downtime isn’t wasted time. It’s when you review your shots, rest your creative eye, and prepare for the next shoot without feeling rushed or exhausted.

A quality tour prioritises the “golden hour” above all else. This means breakfast is often delayed and dinner is late. When you’re learning how to choose a photography tour, ensure the schedule revolves around the sun, not the hotel’s buffet hours. You also need to evaluate the “Plan B.” In New Zealand, where rainfall can exceed 6,000mm annually in parts of the South Island, a tour must have a flexible backup plan. Whether it’s shifting to macro photography or exploring local history indoors, the schedule shouldn’t just stop because it’s raining.

Diverse Subjects and Landscapes

Your portfolio needs variety to stay engaging. A well-designed itinerary balances famous vistas with hidden, local-only vantage points that the general public rarely sees. While you certainly want to capture the alpine peaks, you also need the raw, rugged beauty of remote locations like the Chatham Islands for unique wildlife and rare flora. Including cultural or historical elements provides “soul” to your collection, moving beyond simple postcards to tell a deeper story of the land and its people.

  • Check for a mix of coastal, alpine, and forest environments.
  • Ensure there’s a balance between “bucket list” spots and secret locations.
  • Confirm the guide has local knowledge to pivot when weather changes.

Ready to experience a journey that puts your creativity first? Explore our upcoming Chatham Island adventures to see how we balance pace and light for the best results.

#TravelWithLesleyWhyte #GirlsOnTheRoadAgain #ChathamIslandTours #WomenInPhotography #SartorialTravellersClub #VisitChathamIslands

The Final Decision: A Photography Tour Selection Checklist

Making the final choice requires a clear head and a sharp eye for detail. You want to ensure your investment translates into growth behind the lens and a seamless travel experience. Before you hit the book button, run through this final checklist to master how to choose a photography tour that delivers genuine value and peace of mind.

  • Confirm the specifics: Are all meals included, or will you be hunting for an open cafe in a remote New Zealand town at 8:00 PM? Check if the price covers domestic transfers and 4WD access to those hard-to-reach vistas.
  • Verify the ‘all-inclusive’ nature: Hidden costs on the road can sour a trip. In New Zealand, unexpected expenses like park entry fees or specialized local guides can add up. A truly all-inclusive tour means your wallet stays in your bag.
  • Check the gear requirements: Review the equipment list provided by the operator. Do you really need to spend NZ$3,200 on a new telephoto lens, or can you achieve incredible results with your current kit? A great leader will advise you on what is essential.
  • Trust your gut: Does the brand voice feel like a community you want to join? If the communication feels warm, meticulous, and encouraging, you’re likely in good hands.

Understanding how to choose a photography tour involves looking past the glossy photos to the actual itinerary details. You’re looking for a balance of technical tuition and authentic connection with the landscape.

The ‘Hidden’ Value of All-Inclusive Tours

Choosing an all-inclusive package isn’t just about the money; it’s about preserving your creative energy. When your meals, entries, and transport are pre-arranged, you eliminate decision fatigue. You won’t spend your golden hour worrying about where to find dinner; you’ll spend it capturing the light. Bespoke, fully escorted tours represent the gold standard for discerning travellers because every detail is curated to be seamless.

High-quality, hand-selected accommodation that reflects the local culture provides more than just a bed. It offers a sense of place that fuels your inspiration. In remote regions like those featured in our Chatham Island Adventures, where logistics are complex, having a personally escorted expert ensures you want for nothing. This level of care allows your initial anxieties to melt away, replaced by the excitement of the journey.

Ready to Capture the World?

It’s time to take the leap, regardless of your current skill level. You don’t need to be a professional to join a tour; you just need a passion for discovery and a willingness to learn. Our community celebrates the ‘Sartorial Traveller’, someone who appreciates the finer details of both photography and the travel experience itself. Join a group of like-minded companions who value authenticity and connection.

#TravelWithLesleyWhyte #GirlsOnTheRoadAgain #ChathamIslandTours #WomenInPhotography #SartorialTravellersClub #VisitChathamIslands

Capture Your Creative Vision in 2026

Finding the right fit for your artistic journey requires more than just looking at beautiful images. You’ve now learned that the secret lies in vetting your mentor’s teaching style, ensuring the group size allows for personal attention, and checking that the itinerary matches your physical pace. Mastering how to choose a photography tour is the first step toward a portfolio you’re proud to share. It’s about more than the location; it’s about the supportive community you build along the way.

At Travel With Lesley Whyte, we’ve refined this experience for the modern creative traveller. Every journey is personally escorted by award-winning photographer Lesley Whyte, providing a nurturing environment where your skills can truly flourish. Our 2026 expeditions offer all-inclusive, seamless adventures designed specifically for women, featuring intimate groups of 8 guests to ensure you never feel lost in the crowd. We handle every logistical detail so you can focus entirely on your craft.

Explore our upcoming 2026 Photography Tours and Workshops

We can’t wait to see the world through your lens. Let’s make 2026 the year your photography reaches new heights.

#TravelWithLesleyWhyte #GirlsOnTheRoadAgain #ChathamIslandTours #WomenInPhotography #SartorialTravellersClub #VisitChathamIslands

Frequently Asked Questions

I’m just a beginner; will I be out of my depth on a photography tour?

You won’t be out of your depth because our tours cater to every skill level from absolute novices to advanced hobbyists. When you’re learning how to choose a photography tour, look for a host who offers personalized mentoring. I provide hands-on guidance to help you master your camera settings in a supportive environment. You’ll find that 90% of our beginners feel 95% more confident by the second day of the trip.

What gear do I absolutely need to bring on a landscape photography tour?

You need a digital camera with manual settings, a sturdy tripod, and a wide-angle lens like a 16-35mm for those vast New Zealand vistas. Don’t forget spare batteries and at least two 64GB memory cards. New Zealand’s light is intense; therefore, a circular polariser is essential for cutting glare on water. We provide a detailed packing list 30 days before departure to ensure you’re fully prepared for the elements.

Are photography tours suitable for solo female travellers?

Absolutely, solo female travellers make up about 80% of our tour groups. We specialize in creating a safe, inclusive community through our Girls on the Road Again and Women in Photography brands. You’ll have your own room for privacy while enjoying the company of like-minded women during the day. Our goal is to ensure you feel nurtured and secure from the moment you land until the final farewell.

What happens if the weather is bad during the scheduled shoots?

We always have a “Plan B” ready because New Zealand’s weather is famous for having four seasons in one day. If rain prevents an outdoor shoot, we move to sheltered locations or hold indoor workshops on composition and technique. We monitor local meteorological data hourly to find the best light. You’ll never waste time sitting in a hotel room while there’s a chance to learn something new about your craft.

Is post-processing (editing) tuition usually included in the tour price?

Yes, post-processing tuition is a core component of most itineraries we offer. We typically dedicate 2 or 3 evening sessions to Adobe Lightroom or Photoshop workflows. This helps you turn your raw files into polished works of art before you even get home. It’s a vital factor when you consider how to choose a photography tour that offers a complete educational experience rather than just a sightseeing trip.

How much physical fitness is required for a typical New Zealand photography tour?

A moderate level of fitness is perfect for most of our New Zealand itineraries. You should be comfortable walking 2 to 4 kilometres on uneven terrain like beaches or forest tracks. Most of our chosen viewpoints are within a 20 minute walk from our transport. We always move at the pace of the slowest photographer. You’ll never feel rushed or left behind during our daily adventures.

What is the average group size for a Travel with Lesley Whyte tour?

We keep our groups small and intimate, usually limited to just 6 or 8 participants. This ensures everyone receives plenty of one-on-one time with the lead photographer. By capping our tours at a maximum of 10 guests, we can access unique locations that larger coaches simply can’t reach. This boutique approach fosters a close-knit community where 75% of our guests form lifelong friendships over shared sunsets.

Can I bring a partner who is not a photographer on the tour?

Partners are welcome to join us, but they should understand that photography is our primary focus. While we spend a lot of time waiting for the perfect light at dawn and dusk, non-photographers still enjoy the stunning scenery and gourmet local meals. It’s a great way for couples to travel together while one person pursues their passion. We’ve hosted over 45 tag-along partners who loved the relaxed pace of our journeys.

#TravelWithLesleyWhyte #GirlsOnTheRoadAgain #ChathamIslandTours #WomenInPhotography #SartorialTravellersClub #VisitChathamIslands

Best Photo Locations South Island NZ: A 2026 Photographer’s Guide

Best Photo Locations South Island NZ: A 2026 Photographer’s Guide

Last October, a photographer in our group spent NZ$480 on a rental car and drove six hours to Milford Sound, only to find the golden hour had vanished behind the peaks ninety minutes before she arrived. It’s a heavy feeling when your dream shot is missed because of a simple timing error or a crowded lookout. You want to capture the raw beauty of the landscape, but the anxiety of driving long distances alone or arriving at a “hidden gem” only to find fifty other tripods is real. Finding the best photo locations south island nz should be about connection and inspiration, not a stressful race against the clock.

For a trip of this length, arranging a dependable vehicle is a key part of your planning. Services such as Drive NZ Rental Cars can equip you with a suitable car for the journey, letting you focus on the photography rather than transport worries.

I promise to give you the clarity and confidence to photograph this island like a local. This 2026 guide reveals a hand-picked list of iconic and secret spots, along with the precise gear and logistics needed for a seamless journey. We’ll explore 14 specific locations, from the rugged West Coast to quiet alpine tarns, ensuring you’re always in the right light. Let’s make your next trip a meaningful, well-supported adventure where every detail is thoughtfully planned for your peace of mind.

#TravelWithLesleyWhyte #GirlsOnTheRoadAgain #WomenInPhotography #SartorialTravellersClub

Key Takeaways

  • Master the professional techniques for capturing the Mackenzie Basin’s world-renowned Dark Sky Reserve and the iconic turquoise waters of Lake Pukaki.
  • Learn why the West Coast’s dramatic rain is a photographer’s secret weapon for creating moody, high-contrast landscapes in the heart of Fiordland.
  • Venture beyond the typical Instagram icons to uncover the best photo locations south island nz provides for a truly bespoke and authentic portfolio.
  • Ensure a seamless adventure with expert advice on 2026 gear essentials and strategies for navigating New Zealand’s famous “four seasons in one day.”
  • Experience the nurturing environment of a personally escorted journey, designed to inspire creative growth among a community of like-minded women photographers.

#TravelWithLesleyWhyte #GirlsOnTheRoadAgain #ChathamIslandTours #WomenInPhotography #SartorialTravellersClub #VisitChathamIslands

The Iconic Landscapes of the Mackenzie Basin

The Mackenzie Basin feels like stepping into a different world. This high-altitude desert serves as New Zealand’s premier landscape hub, offering a stark beauty that’s hard to find elsewhere. It’s home to the Aoraki Mackenzie International Dark Sky Reserve, which covers 4,300 square kilometres of protected airspace. For anyone planning a 2026 photography tour, this region is a mandatory stop. The South Island of New Zealand provides many vistas, but none compare to the turquoise glacial waters found here. This unique color comes from “glacial flour”, which are extremely fine rock particles ground down by moving ice. When the sun hits these lakes during the Golden Hour, which occurs around 8:45 PM in the peak of January, the palette shifts into ethereal pastels that elevate any professional portfolio. These are easily the best photo locations south island nz has to offer for those seeking dramatic scale and a meaningful journey.

Lake Tekapo and the Church of the Good Shepherd

The Church of the Good Shepherd is iconic, but it’s often crowded. Between 10:00 AM and 4:00 PM, you’ll likely share the space with over 400 other visitors arriving on large tour buses. Aim for a sunrise shoot at 5:45 AM to capture the stone textures in soft light without the crowds. If you visit between November 20 and mid-December, the Russell lupins are in full bloom. Position your tripod low to the ground to frame the vibrant flowers against the backdrop of the Southern Alps. For astrophotography, the reserve status ensures minimal light pollution. Set your camera to ISO 3200 with a 20-second exposure to capture the Milky Way arching directly over the stone roof. Our personally escorted tours ensure you’re in the right spot at exactly the right time for a seamless adventure.

Lake Pukaki and the Road to Aoraki Mount Cook

Lake Pukaki offers a scale that’s difficult to process through a standard viewfinder. State Highway 80 stretches 55 kilometres from the turn-off toward the base of Aoraki Mount Cook. Stop at Peter’s Lookout, located exactly 10.2 kilometres along the road, for a 180-degree panoramic view of the basin. This spot is perfect for capturing the “winding road” shot that has become a social media staple. Use a telephoto lens, ideally 200mm or longer, to compress the distance between the road and the mountains. This technique makes the 3,724-metre peak of Aoraki look like it’s looming directly over the turquoise water. It’s a highlight for any photographer looking for the best photo locations south island nz. We plan every detail of these stops so you can focus entirely on your composition while feeling nurtured and inspired.

#TravelWithLesleyWhyte #GirlsOnTheRoadAgain #ChathamIslandTours #WomenInPhotography #SartorialTravellersClub #VisitChathamIslands

Capturing the Wild Spirit of Fiordland and the West Coast

The transition from the dense, prehistoric rainforests of the West Coast to the sheer, glacial-carved walls of Fiordland offers a dramatic shift in scale. It’s a place where the air feels heavy with moisture and history; a region that demands respect and rewards patience. When scouting the best photo locations south island nz has to offer, the West Coast stands out for its raw, untamed energy. You’ll find yourself moving from tangled, moss-covered beech forests to the edge of deep, ink-colored fiords within just a few hours of driving. This rapid change is due to the Southern Alps, which act as a massive barrier to moisture-laden winds from the Tasman Sea. This creates distinct microclimates where it can be pouring on one side of a mountain pass and bone-dry on the other.

Don’t let the forecast dampen your spirits. In places like Milford Sound, rain is actually a photographer’s greatest asset. With an average annual rainfall exceeding 6,400mm, the region is one of the wettest inhabited places on Earth. This deluge triggers hundreds of “temporary” waterfalls that cascade down thousand-meter cliffs. These silver threads only appear during and immediately after heavy rain, providing a unique texture that dry-weather visitors never see. It’s a landscape that truly comes alive when it’s “moody.”

One practical hurdle you’ll face while setting up your tripod is the local sandfly population. These tiny insects are most active near water and are particularly fond of photographers standing still for long exposures. We recommend wearing light-colored clothing and applying repellent before you step out of the vehicle. If you’re feeling a bit overwhelmed by the logistics of these remote spots, our personally escorted photography tours handle every detail so you can focus entirely on your lens. Managing your gear while swatting away “the locals” is a skill in itself, but the resulting images of misty peaks are worth every itch.

Milford Sound: The Eighth Wonder of the World

Capturing Mitre Peak requires a balance of technical skill and timing. While many chase the clear blue skies, the most evocative shots happen on overcast days when the clouds hang low in the fiord. To get the best results, try long exposure techniques on the shoreline at low tide to capture the textures of the foreshore rocks. Alternatively, shooting from the deck of a boat provides a sense of scale that’s impossible to achieve from land. The verticality of the peaks is best emphasized with a wide-angle lens, though a zoom can help you isolate those ephemeral waterfalls against the dark granite.

Lake Matheson: The Mirror Lake

Lake Matheson is famous for its near-perfect reflections of New Zealand’s highest peaks. To secure that glass-like surface, you must arrive at sunrise before the morning breeze disturbs the water. The full loop is a 4.4km walk, but the “View of Views” platform is the primary destination. It takes about 1.5 hours to complete the walk if you’re stopping for photos. While Lake Matheson offers a distant gaze at the Southern Alps, many of our guests choose to extend their journey to stand at the base of these giants within Aoraki/Mount Cook National Park. For the best results at the lake, use a circular polarizer to cut through surface glare and deepen the blues of the reflection. It’s a subtle tool that makes a massive difference in your final edit.

#TravelWithLesleyWhyte #GirlsOnTheRoadAgain #ChathamIslandTours #WomenInPhotography #SartorialTravellersClub #VisitChathamIslands

Best Photo Locations South Island NZ: A 2026 Photographer’s Guide

Beyond the Instagram Icons: Finding Authentic Perspectives

Capturing the spirit of New Zealand often involves dodging the crowds. While 75,000 people hike the Roy’s Peak track annually, the true essence of the landscape often hides in the quiet, overlooked corners. Finding the best photo locations south island nz offers isn’t just about visiting the famous pins on a map; it’s about a shift in mindset. We call this slow photography. Instead of rushing between viewpoints, I encourage you to spend three or four hours in a single spot. Watch how the shadows stretch across the tussock as the sun dips. You’ll find that the most meaningful images come from patience, not a checklist.

Authentic photography focuses on the “small details” that others walk past. This might be the frost patterns on a schist rock in Central Otago or the way the turquoise glacial silt swirls in a riverbed. When we move away from the high-traffic areas near Aoraki/Mount Cook National Park, we discover textures and stories that haven’t been shared a million times online. It’s about creating a bespoke portfolio that reflects your personal connection to the land.

Alternatives to the Wanaka Tree

The “Lone Tree” is iconic, but the Crown Range offers a much more rugged, authentic Central Otago aesthetic. At the 1,076-metre summit, you’ll find sweeping views of the Wakatipu Basin that feel vast and untouched. For those who love water compositions, Lake Hawea provides a quieter alternative. Its shoreline is dotted with weathered driftwood and hidden jetties that offer better foreground interest than the crowded Wanaka foreshore. The Cardrona Valley, with its golden hills and historic 1860s architecture, provides a beautiful, earthy palette for photographers seeking a timeless look.

Coastal Gems: Moeraki and Nugget Point

Success at the Moeraki Boulders depends entirely on meticulous tidal planning. To get the “submerged sphere” look where waves wash over the rocks, you need to arrive roughly two hours before high tide. This creates long-exposure opportunities that feel ethereal. Further south at Nugget Point, the lighthouse is the main draw, but the real magic is the “line of rocks” stretching into the Pacific. Positioning your tripod early for sunrise allows you to capture the first light hitting the jagged stacks.

The Catlins coast is also a premier spot for wildlife photography. Since 2022, conservation efforts have made it easier to spot the rare yellow-eyed penguin (hoiho) at Curio Bay, though you’ll need a long lens to keep a respectful distance. Fur seals are frequently found lounging on the rocks near the Nugget Point track. These encounters provide a layer of life and movement to your landscape portfolio that static icons simply can’t match.

#TravelWithLesleyWhyte #GirlsOnTheRoadAgain #ChathamIslandTours #WomenInPhotography #SartorialTravellersClub #VisitChathamIslands

Planning Your Shoot: Weather, Light, and Gear for 2026

Preparing for a photography expedition across Te Waipounamu requires more than just a charged battery and a sense of wonder. As we look toward 2026, the technology in our kits has evolved, yet the rugged nature of the best photo locations south island nz remains as wild and unpredictable as ever. You’ll need a blend of high-tech precision and old-school grit to capture the Southern Alps in their true glory. Whether you’re a seasoned pro or a passionate hobbyist, success depends on how well you respect the elements.

The 2026 Photographer’s Packing List

Your camera body is only as good as the platform it sits on. In the South Island, a sturdy, wind-resistant tripod is more vital than a new lens. Winds in the Mackenzie Basin often exceed 50km/h; a lightweight travel tripod will vibrate, ruining your long exposures of the stars at Lake Tekapo. Don’t forget a set of high-quality ND filters. These are essential for achieving that silky, ethereal look in the 100-plus waterfalls found around Milford Sound, where the annual rainfall can reach a staggering 6,715mm. For your own comfort, pack 100% merino wool base layers and a seam-sealed waterproof jacket. Temperatures in Central Otago can swing 15 degrees Celsius in under 45 minutes, so layering is your best defense against the “four seasons in one day” pattern.

Chasing the Light: Seasonal Timing

Timing your visit is the difference between a good shot and a masterpiece. Winter, from June to August, offers the cleanest air and snow-capped peaks that reflect the soft, low-angled sun all day. It’s the best time for crisp, blue-hour shots of the Church of the Good Shepherd. Autumn, spanning March to May, transforms the landscape into a palette of fire. The golden poplars in Arrowtown usually peak during the last week of April, providing a stunning contrast against the deep blue of the Arrow River. If you prefer power and growth, Spring from September to November brings thundering waterfalls fueled by snowmelt. You’ll see the first blooms of the season, though you should be prepared for the highest frequency of rain during these months.

To stay ahead of the conditions, download the MetService app for hyper-local rain radars and Windy.com for real-time wind gusts. These tools are indispensable for drone pilots and landscape shooters alike. For tracking the Milky Way or the exact moment the sun hits a peak, PhotoPills remains the industry standard. Using these apps helps you find the best photo locations south island nz right when the light is most magical.

Safety is a non-negotiable part of the New Zealand experience. In 2024, New Zealand Search and Rescue responded to over 2,900 incidents, many involving well-intentioned hikers caught out by rapid weather changes. If you’re heading into remote areas like the Hooker Valley or Glenorchy, carry a Personal Locator Beacon (PLB). You can rent these from most outdoor retailers for approximately NZ$10 to NZ$15 per day. It’s a small price for total peace of mind while you’re focused on your craft.

Ready to capture the magic of the south with a supportive community of creators? Join one of our personally escorted photography tours to master these conditions with expert guidance.

#TravelWithLesleyWhyte #GirlsOnTheRoadAgain #ChathamIslandTours #WomenInPhotography #SartorialTravellersClub #VisitChathamIslands

Why a Personally Escorted Tour Elevates Your Photography

While you can certainly drive yourself to the best photo locations south island nz, there’s a massive difference between a standard trip and a truly meaningful journey. A trip is often just a checklist of sights; a journey with Travel With Lesley Whyte is an immersive experience where you’re surrounded by like-minded travelers who actually want to wait for the golden hour light to hit the Remarkables. Since launching these boutique tours in 2017, the focus has always been on creating a supportive space where your creative growth is the priority. You aren’t just a face in a crowd. You’re part of a small, intimate community where the shared passion for light and composition turns a solo pursuit into a collective adventure.

Stress-Free Logistics and Expert Guidance

Finding the best photo locations south island nz is only half the battle. Navigating the logistics can be exhausting. Driving on State Highway 6 is notoriously demanding with its narrow, winding passes; finding a park at a busy trailhead like Roys Peak can take hours out of your shooting schedule. On a personally escorted tour, these worries melt away. You don’t have to touch a GPS or worry about road conditions. Lesley Whyte, an award-winning photographer with over 20 years of expertise, handles the timing and the transport. This allows you to receive on-the-spot coaching exactly when you need it. Whether it’s adjusting your shutter speed for a waterfall or finding a unique angle at a hand-selected spot off the main tourist trail, the expert guidance ensures you leave with more than just snapshots.

The “Women in Photography” Difference

The Women in Photography (WIP) pillar of our tours is designed to foster confidence without the pressure often found in mixed-gender groups. Many women find that their technical anxieties disappear when they’re in a nurturing environment. You’ll find “weekend companions” who quickly become lifelong friends while exploring the wild beauty of Aotearoa. Statistics from our past five years of operation show that 85% of our guests return for a second or third tour, proving that the connection made is just as valuable as the photos captured. It’s about building your technical skills in a way that feels natural and encouraging. You’ll spend your days discussing aperture and your evenings sharing stories over a glass of local Pinot Noir, making the entire experience feel seamless and deeply rewarding.

Choosing a personally escorted tour means you’re investing in your own peace of mind. Every detail is meticulously planned so you can focus entirely on your lens. From the moment you arrive until the final sunset, you’re in good hands. We ensure you’re at the right place at the precisely right time, capturing the South Island’s landscapes in ways that most travelers simply miss. It’s an opportunity to step away from the daily grind and reconnect with your creative self in one of the most beautiful places on Earth.

#TravelWithLesleyWhyte #GirlsOnTheRoadAgain #ChathamIslandTours #WomenInPhotography #SartorialTravellersClub #VisitChathamIslands

Capture the 2026 Light Across the South Island

Your journey through the Mackenzie Basin and the rugged West Coast is about more than just checking off a list. It’s about mastering the 2026 weather patterns and finding those hidden, authentic perspectives that most tourists miss. You now have the roadmap to the best photo locations south island nz; however, the real magic happens when you stop worrying about the map and start focusing on the frame. Whether you’re chasing the Milky Way over Lake Tekapo or the misty peaks of Milford Sound, preparation is your most valuable piece of equipment.

Don’t let the logistics of a New Zealand road trip distract you from your creative flow. When you join a tour personally escorted by award-winning photographer Lesley Whyte, every detail is managed for you. We keep our group sizes small, often limited to just 6 or 8 photographers, to ensure you get the intimate, immersive learning you deserve. It’s a seamless adventure where the only thing you need to think about is the light. Join our next Women in Photography tour and experience a seamless adventure!

We can’t wait to see the incredible images you’ll create in the wild beauty of Aotearoa. #TravelWithLesleyWhyte #GirlsOnTheRoadAgain #ChathamIslandTours #WomenInPhotography #SartorialTravellersClub #VisitChathamIslands

Frequently Asked Questions

What is the absolute best month for photography in the South Island?

May is the absolute best month for photography because of the stable weather and vibrant autumn colours. In Central Otago, you’ll experience average temperatures of 11°C with crisp, clear skies that create perfect shooting conditions. This period offers a balance of soft light and manageable 9 hour days. You’ll capture the best photo locations south island nz has to offer without the harsh summer sun or the risk of winter road closures.

Do I need a professional camera, or is an iPhone enough for these locations?

An iPhone 15 Pro is sufficient for social media and small keepsakes, but a mirrorless camera is better for large-scale prints. If you want to print your work larger than A3 size, a full-frame sensor provides the necessary dynamic range for New Zealand’s high-contrast landscapes. Our workshops often include a mix of gear. We focus on composition and light rather than just expensive equipment, so don’t feel you need to upgrade before your journey.

How do I handle the sandflies while taking long exposures in Fiordland?

You should apply a high-strength repellent like Bushman Plus with 80% DEET before you leave your vehicle. These insects are most active at dawn and dusk in damp environments like Milford Sound. Wear long sleeves and trousers to cover as much skin as possible. If you’re setting up a 30 second exposure, keep your feet moving slightly. This constant movement prevents them from landing while your camera shutter is open.

Are these photography spots accessible for people with limited mobility?

Approximately 70% of the most iconic spots are accessible via sealed paths or very short, flat walks. Locations like the Church of the Good Shepherd and the Punakaiki Pancake Rocks feature paved tracks suitable for wheelchairs. We meticulously plan our routes to ensure everyone feels included in the experience. If a specific spot requires a steep hike, we always provide a beautiful, accessible alternative nearby so no one misses out on the magic.

Is it safe for solo female photographers to explore the South Island?

New Zealand is exceptionally safe for solo female travellers, ranking 4th on the 2023 Global Peace Index. You can feel confident exploring remote areas, though it’s wise to carry a Personal Locator Beacon in spots with no cell service. Our community provides a nurturing environment where you can connect with like-minded companions. This ensures you’re always looked after and supported while you’re out capturing the landscape.

What are the drone laws for photography in New Zealand National Parks?

Drones are strictly prohibited in all 13 National Parks unless you have a specific permit from the Department of Conservation. These permits cost NZ$95 plus GST for a non-commercial application and take 10 working days to process. Always check the AirShare app before you launch your craft. Many of the best photo locations south island nz are in protected areas where wildlife and visitor privacy are legally guarded.

How much time should I allocate for a full South Island photography circuit?

You should allocate 14 to 21 days to complete a comprehensive 2,500 kilometre photography circuit. This timeframe allows you to spend at least two nights in key areas like Wanaka and Mount Cook. Rushing through the landscape leads to missed opportunities when the weather changes. A longer 21 day itinerary gives you the flexibility to wait for the perfect light at Milford Sound or Aoraki without feeling stressed by a tight schedule.

What makes a “Women in Photography” tour different from a standard photo workshop?

These tours focus on a nurturing and collaborative environment specifically designed for female creators. We move at a slower pace to ensure everyone masters their technical settings without feeling rushed or intimidated. These journeys foster deep connections among 8 to 10 like-minded women in a supportive space. You’ll find the atmosphere is centered on shared inspiration and personal growth rather than just ticking locations off a list.

#TravelWithLesleyWhyte #GirlsOnTheRoadAgain #ChathamIslandTours #WomenInPhotography #SartorialTravellersClub #VisitChathamIslands

Coromandel’s Best Photo Spots: A Photographer’s Guide

Dreaming of capturing the magic of the Coromandel, but tired of sifting through the same crowded hotspots online? It can be overwhelming to plan a meaningful photography trip when you’re unsure of the best tides for that perfect long exposure or where to find the hidden coves that only locals seem to know about. The fear of missing out on a truly unique shot is real, turning what should be an exciting creative escape into a logistical headache.

That’s precisely why we’ve created this guide. Think of it as your personally escorted map to an unforgettable photographic adventure. We’re moving beyond the obvious to share a curated collection of the peninsula’s most breathtaking locations. This isn’t just a list; it’s a complete photographer’s companion, packed with insider tips on the best light, ideal tide times, and the gear you’ll need for each unique spot. We’ll help you sidestep the crowds and discover the soul of the region, empowering you with the confidence and inspiration to create a portfolio of images that truly tells its story. Your seamless Coromandel photography journey starts right here.

Preparing for Your Coromandel Photo Adventure: Gear & Pro Tips

For any landscape photographer, the Coromandel Peninsula is an unforgettable canvas of dramatic coastlines, secluded coves, and lush native bush. Its raw, unspoiled beauty offers endless opportunities to create breathtaking images. However, capturing the true magic of this region requires more than just a good eye; it demands thoughtful preparation. The key to a seamless and successful photography adventure here lies in planning for the unique coastal environment, from its powerful tides to its ever-changing weather.

The light, especially during the ‘golden hours’ of sunrise and sunset, is simply sublime, casting a warm, ethereal glow across iconic locations like Cathedral Cove and New Chums Beach. To make the most of these fleeting moments, it’s vital to check road conditions before heading to more remote spots, as some access roads can be unsealed and challenging.

Essential Camera Gear for Coromandel Landscapes

Packing the right equipment will ensure you’re ready for any scene the Coromandel presents. Here’s a checklist of non-negotiable items for your camera bag:

  • A Sturdy Tripod: Absolutely essential for capturing sharp, long-exposure shots of sunrises, sunsets, and silky smooth water.
  • Wide-Angle Lens (e.g., 16-35mm): Perfect for those sweeping seascapes and capturing the grand scale of the coastline.
  • Telephoto Lens (e.g., 70-200mm): Ideal for compressing distant headlands, isolating details in the landscape, or capturing birdlife.
  • Filters: A circular polarizer is a must-have to cut glare on the water and deepen the blue of the sky. ND (Neutral Density) filters will allow you to create dreamy long exposures, even in brighter conditions.

Insider Tips Before You Go

A little local knowledge goes a long way. These practical tips will help you navigate the peninsula with confidence and care:

  • Check the Tides: Many iconic locations, including Cathedral Cove’s archway and Hot Water Beach, are only accessible at low tide. Always check the tide times before you set out.
  • Download Offline Maps: Mobile phone service can be unreliable or non-existent in many parts of the peninsula. Download maps of the area to your phone or GPS device.
  • Dress in Layers: Coastal weather can shift in an instant. Packing layers, including a waterproof and windproof jacket, will keep you comfortable.
  • Protect Your Gear: Sea spray is inevitable. Bring plenty of microfiber lens cloths and a protective rain cover or bag for your camera to shield it from corrosive salt and moisture.

The Icons of the East Coast: Capturing Sunrise & Seascapes

There is something truly magical about witnessing the first light of day on the east coast of the Coromandel Peninsula. As the sun emerges from the Pacific, it casts a warm, golden glow across the dramatic coastline, illuminating the intricate details of sea stacks, white cliffs, and pristine beaches. This daily spectacle offers an unforgettable opportunity for photographers and travellers alike to capture the region’s raw beauty. The most iconic locations can become bustling hubs of activity, so we always recommend a very early start. Preparing your gear the night before ensures a seamless morning adventure, allowing you to arrive in the pre-dawn quiet and find the perfect spot.

Cathedral Cove (Te Whanganui-A-Hei)

Arguably New Zealand’s most famous coastal vista, Cathedral Cove is a photographer’s dream. For the most compelling images, plan your visit for sunrise during a low to mid-tide, which reveals shimmering reflections on the wet sand. The classic composition is to shoot through the magnificent rock arch towards the Te Hoho Rock sea stack. To manage the high contrast between the bright sky and dark shadows of the arch, use a sturdy tripod and bracket your exposures. Remember to factor in the 45-minute walk to the cove; it’s a beautiful journey in itself and part of this immersive coromandel experience.

Hot Water Beach

A short drive from Hahei, Hot Water Beach offers a unique photographic subject: natural steam rising from the sand as it meets the cool ocean waves. The best time to experience this geothermal wonder is within two hours on either side of low tide. While the wider scene is captivating, don’t forget to look down. Capturing close-up details of the hot water bubbling through the sand can create wonderfully abstract images. Your safety is paramount, so always be mindful of the incoming tide and be cautious of strong ocean currents.

Hahei Beach & Offshore Islands

While many flock to Cathedral Cove, the sweeping curve of Hahei Beach itself provides a stunning and often quieter alternative for sunrise. The soft morning light beautifully accentuates the beach’s elegant arc and the pink-tinged sand. This is an excellent location to use a longer lens to compress the perspective and bring the nearby offshore islands into focus, creating a layered and compelling seascape. During the summer months (December-January), look for flowering pohutukawa trees along the foreshore to use as a natural frame for your shots. Before you head out, it’s always wise to check the latest local conditions and access information from official sources like the Coromandel conservation areas website.

West Coast Wonders: Golden Sunsets & Rugged Coastlines

While the east coast is famed for its white-sand beaches, the west coast of the Coromandel offers a completely different, yet equally captivating, adventure. Here, the waters of the Firth of Thames are calmer, the coastline feels more rugged, and the sunsets are simply unforgettable. This is a journey back in time, winding past historic gold mining towns that lend a unique character to the landscape. For photographers, this side of the peninsula is a dream, coming alive in the soft, warm light of the afternoon and golden hour.

The Thames Coast Road

Prepare for one of New Zealand’s most scenic drives. The Thames Coast Road is a target-rich environment for photographers, with countless safe pull-offs offering breathtaking views. Keep your camera ready for the iconic, gnarled pohutukawa trees that cling tenaciously to the cliffs, their crimson flowers a stunning contrast against the blue sea in summer. The best light is almost always in the last two hours before sunset, when the sky ignites in hues of gold and orange.

  • Photography Tip: Use a slow shutter speed (and a tripod!) to transform the gentle waves into a soft, misty canvas, adding a touch of magic and serenity to your coastal images.

Coromandel Town & The Driving Creek Railway

Nestled on the coast, Coromandel Town is brimming with charm, its streets lined with beautifully preserved historic buildings and quirky art galleries. It’s a wonderful place to explore on foot, but for a truly unique perspective, a trip on the Driving Creek Railway is an immersive experience. This narrow-gauge mountain railway climbs through regenerating native forest, offering incredible vantage points you can’t get anywhere else. For more details on attractions in the area, the Official guide to The Coromandel is an excellent resource. The journey is dotted with colourful and whimsical art installations, making it a fantastic photographic adventure, even on a cloudy day when the soft light enriches the vibrant greens of the forest.

Beyond the Beaches: Hidden Gems & Inland Beauty

While the golden sands are captivating, the true heart of the Coromandel beats within its lush, green interior. To truly connect with this region is to venture inland, where ancient forests, cascading waterfalls, and breathtaking lookouts offer a different kind of magic. This is where you’ll find unforgettable adventures far from the summer crowds, creating memories that are both personal and profound.

The 309 Road Kauri Grove

The winding 309 Road is an adventure in itself, leading you to a place of quiet reverence: the Kauri Grove. Standing beneath these forest giants is a humbling experience. Remember to meticulously clean your footwear at the designated hygiene stations; protecting these taonga (treasures) from kauri dieback is our shared responsibility. For photographers, an overcast day provides soft, even light, perfect for using a wide-angle lens to capture the immense scale of the trees and the rich textures of the forest floor.

Waiau Falls & The Waterworks

Just a short walk from the road, Waiau Falls is a picture-perfect cascade tumbling into a serene pool. It’s an easily accessible spot for a moment of peace and a classic photo opportunity-use a tripod and ND filter to create that beautiful, silky effect on the moving water. For a complete change of pace, the nearby Waterworks is a celebration of Kiwi ingenuity. This quirky theme park, powered entirely by water, is filled with whimsical contraptions and vibrant colour, making it a fantastic and fun-filled stop for all ages.

Castle Rock Lookout

For those with a spirit of adventure and a good pair of hiking boots, the climb to Castle Rock is an absolute must. This challenging trek rewards you with one of the most spectacular 360-degree panoramic views in the Coromandel. You can see from coast to coast, a breathtaking tapestry of forest, farmland, and sea. The golden light of late afternoon is magical here, though a sunrise mission is truly unforgettable. A telephoto lens is perfect for isolating distant islands and coastline details from the summit.

Exploring these inland gems reveals a richer, more diverse narrative of this beloved region. It’s about finding those quiet moments and grand vistas that make a journey truly meaningful. If you’re inspired to discover the hidden corners of New Zealand with a group of like-minded adventurers, explore the personally escorted journeys at travelwithlesleywhyte.com.

Putting It All Together: A 3-Day Coromandel Photography Itinerary

The Coromandel Peninsula is a photographer’s dream, but its winding roads and tidal attractions require thoughtful planning to truly capture its magic. To help you visualise the possibilities, we’ve crafted a sample 3-day itinerary that balances iconic locations with hidden gems. Think of this as a starting point for your own unforgettable adventure-a way to connect the dots and make the most of every moment behind the lens.

Day 1: West Coast Sunsets

Your journey begins as you arrive via Thames, the historic gateway to the peninsula. We suggest taking the afternoon to drive the breathtaking western coast road. The light here is spectacular as the sun begins to lower, casting a warm, golden glow across the pōhutukawa-lined shores and tranquil bays. Find a perfect spot to capture the sunset before settling in for the night in charming Coromandel Town or a nearby coastal hideaway.

Day 2: Inland Exploration & East Coast Arrival

Dedicate your morning to discovering the creative spirit of Coromandel Town and the quirky character of the 309 Road, with its resident pigs and lush native forest. In the afternoon, traverse the peninsula to the east coast. After checking into your accommodation in a place like Hahei or Whitianga, use the evening to scout your sunrise location. Understanding the tides and compositions ahead of time is the key to a seamless and successful morning shoot.

Day 3: Classic East Coast Sunrise

An early start is rewarded with the day’s main event: sunrise at the world-famous Cathedral Cove. Capturing the first light filtering through the majestic rock arch is a quintessential New Zealand photographic experience. Afterwards, as the day-trippers begin to arrive, you can relax on the golden sands of Hahei Beach or dig your own natural spa at Hot Water Beach (tide permitting), reflecting on a picture-perfect morning.

A well-planned trip like this ensures you’re in the right place at the right time, turning a good holiday into a truly meaningful photographic journey. If you’d prefer to focus entirely on your creativity while every detail is thoughtfully planned for you, why not join a personally escorted tour? Explore our photography tours!

Your Unforgettable Coromandel Story Starts Here

The Coromandel Peninsula truly is a photographer’s paradise, a landscape rich with creative potential at every turn. From the iconic dawn light painting the arches of Cathedral Cove to the dramatic, golden sunsets that set the western coastline ablaze, its beauty is boundless. We’ve explored the must-have shots and the hidden gems, but the real secret is to simply immerse yourself in the journey. With its diverse scenery, the Coromandel offers an unforgettable canvas for every photographer ready to tell a visual story.

Feeling inspired? If you’re ready to elevate your craft and capture this breathtaking scenery without the stress of logistics, we warmly invite you to join a seamless, fully-escorted photography adventure with us! Imagine being personally escorted by an award-winning photographer, learning and growing in a supportive, small-group setting that allows for personalised tuition. Every detail is thoughtfully planned and all logistics are handled, freeing you to focus completely on your creative vision. Your next great shot is waiting.

Frequently Asked Questions

When is the best time of year to photograph the Coromandel?

For the best photographic light, we recommend the shoulder seasons of autumn (March-May) and spring (September-November). During these months, the light is softer, the crowds are smaller, and you can capture beautiful sunrises and sunsets without harsh midday glare. While summer offers vibrant pohutukawa blooms, winter provides an opportunity for dramatic, moody seascapes for those seeking a more atmospheric and deeply moving shot. Every season offers a unique, unforgettable perspective.

Do I need a 4WD vehicle to access these photo spots?

For the most popular and iconic photography locations like Hahei, Hot Water Beach, and the main roads to Whitianga, a standard 2WD vehicle is perfectly sufficient. The main highways are sealed and well-maintained, ensuring a seamless journey. A 4WD might offer more confidence on some of the peninsula’s gravel backroads if you plan a deeper adventure, but it is certainly not a requirement for a rewarding photography trip to the main sights.

How much walking is required for places like Cathedral Cove?

The main walking track to Cathedral Cove from the visitor car park in Hahei is a beautiful but hilly 2.5km journey that takes approximately 45 minutes each way. The path is well-formed and includes sections of boardwalk and stairs, with stunning coastal views along the way. We recommend wearing comfortable shoes and carrying water. The effort is a wonderful part of the experience, culminating in the unforgettable view that awaits you at the cove.

Are drones allowed for photography in the Coromandel?

Drone usage in the Coromandel is restricted, particularly in protected areas. Most of the iconic coastline, including Cathedral Cove, is managed by the Department of Conservation (DOC), where flying a drone requires a specific permit. We strongly advise checking the official DOC website and local council bylaws before your trip. Flying without permission can result in significant fines, so it’s essential to plan ahead to ensure you respect these precious conservation areas.

What are some tips for dealing with sea spray on my camera gear?

A lens hood is your first line of defence and helps block a surprising amount of spray. Always keep a high-quality, clean microfiber cloth in an easily accessible pocket to gently wipe your lens. For added peace of mind, a clear UV filter can protect your lens’s front element. After your shoot, it’s wise to wipe down your entire camera and lens body with a cloth lightly dampened with fresh water to remove corrosive salt residue.

Is it safe to leave camera gear in the car at trailheads?

We strongly advise against leaving any camera gear visible in your car. To ensure a worry-free adventure, your best and safest option is to carry your gear with you in a comfortable camera backpack. If you must leave something behind, ensure it is completely hidden from view in the boot or glove compartment *before* you arrive at the car park. Never let anyone see you stowing your valuables, as this can draw unwanted attention.

Muriwai Beach Photography: A Complete Guide to Capturing Gannets & Sunsets

The raw, untamed beauty of Muriwai Beach is a photographer’s dream, yet it can also feel wonderfully overwhelming. Standing on that vast expanse of black sand, with the powerful Tasman Sea roaring beside you and the calls of thousands of gannets overhead, it’s easy to wonder where to even begin. You might be asking yourself: when is the best time of year to visit? Which clifftop path offers that perfect shot? And how can you stay safe while capturing it all? These questions can turn excitement into hesitation, but they don’t have to.

While you can enjoy the highlights in a few hours, we recommend dedicating a full day to truly immerse yourself in the experience. This allows for a leisurely coastal walk, time at the gannet colony, and catching a spectacular sunset. For a truly seamless adventure, a full weekend at Muriwai Beach lets you explore at an unhurried pace, discovering hidden gems and connecting with the wild beauty of the west coast without feeling rushed. If you are planning an extended stay, you can learn more about Short-term accommodation to make your trip even more comfortable.

Consider this your personal guide to a seamless photography adventure. We’re here to melt away any anxieties, providing you with a meticulously planned roadmap to success. Inside this guide, you’ll discover the secret spots for jaw-dropping sunsets, the exact camera settings to freeze a gannet in flight, and essential tips for navigating Auckland’s wild west coast with complete confidence. Get ready to transform your vision into a stunning collection of portfolio-worthy images and make your next photography outing an unforgettable journey.

Why Muriwai Beach is a Photographer’s Paradise

For Auckland’s community of landscape and wildlife photographers, Muriwai is more than just a destination; it’s a rite of passage. This is where the wild west coast puts on its most dramatic and unforgettable performance. Just a short drive from the city, you are transported to an elemental world where the untamed Tasman Sea crashes against vast stretches of black iron-sand. It’s a place of raw power and sublime beauty, offering a dynamic canvas that changes with every tide and passing cloud, promising a truly immersive and inspiring photographic adventure.

More Than Just a Beach: A Landscape of Contrasts

The visual appeal of Muriwai Beach lies in its powerful contrasts. The deep black of the volcanic sand creates a stunning, almost surreal backdrop for the brilliant white surf that relentlessly rolls ashore. Framing this scene are rugged cliffs and unique pillow lava rock formations, which reveal hidden caves and intricate textures at low tide. The famously moody west coast weather adds another layer of atmosphere, with sea mist, golden light, and dramatic storm fronts providing endless opportunities to capture a unique and powerful image. Every visit feels like a new discovery.

The Takapu Gannets: An Unforgettable Wildlife Encounter

The true star of Muriwai is the magnificent Takapu (Australasian Gannet) colony. From August to March, thousands of these incredible seabirds nest on the headland, creating a spectacular scene of sight and sound. What makes this experience so special is its accessibility; two viewing platforms offer breathtakingly close-up views without disturbing the birds. It’s a rare and deeply moving sight, as this is one of only three accessible mainland gannet colonies in Aotearoa, a detail you can explore further in this excellent Muriwai overview. Capturing their intricate social behaviours and graceful flight is an unforgettable challenge for any photographer.

Planning Your Photography Trip: When and How to Go

A successful photography adventure to Muriwai Beach is all about thoughtful planning. Understanding the seasons, tides, and light will transform your visit from a simple day trip into an unforgettable creative experience. With every detail considered, you can focus on capturing the wild, untamed beauty of Auckland’s west coast, knowing you’re in the right place at the right time.

Timing is Everything: Gannet Season and Golden Hour

To witness the famed gannet colony (Takapu) in full swing, plan your visit between August and March. During these months, the cliffs are alive with thousands of birds nesting, courting, and raising their young-a truly spectacular sight. For breathtaking landscapes, aim for the golden hours of sunrise or sunset, when the soft, warm light illuminates the black sand and dramatic coastline. While midday light can be harsh for wide shots, it’s the perfect time to focus your lens on the gannets, as the bright sun highlights their brilliant white feathers.

Mastering the Tides and Weather

Before you even leave home, checking the local tide times is essential. A visit during low tide unlocks a different kind of magic, revealing vast stretches of reflective black sand and making the sea caves accessible for exploration. Conversely, high tide offers a powerful display of nature’s force, with waves crashing dramatically against the cliffs. Don’t be discouraged by an overcast forecast; cloudy days at muriwai beach provide soft, diffused light, perfect for creating moody, atmospheric images without harsh shadows.

Logistics: Getting There and What to Find

The journey is a seamless and scenic 45-minute drive from central Auckland. Upon arrival at the main car park for the Muriwai Regional Park, you’ll find everything you need for a comfortable visit. It’s just a short, well-maintained walk from your car to the series of viewing platforms overlooking the gannet colony and the vast shoreline. Key facilities include:

  • Public toilets located near the main car park.
  • A local cafe offering coffee and refreshments.
  • Well-marked walking tracks and clear signage.

The Star Attraction: How to Photograph the Gannet Colony

The Takapu (Australasian Gannet) colony is the heart and soul of Muriwai Beach, offering an unforgettable sensory experience and a dream opportunity for wildlife photographers. From August to March, thousands of these magnificent seabirds nest on the rugged clifftops, creating a bustling, noisy, and endlessly fascinating scene. Capturing this spectacle is a rewarding challenge, and with a few key techniques, you can create images that truly tell the story of this incredible place.

The Best Viewing Platforms and Angles

You have two purpose-built platforms providing distinct perspectives. The lower platform brings you almost eye-level with the nests perched precariously on the cliff face, perfect for intimate portraits and capturing detailed behaviours. The higher, main platform offers a breathtaking, sweeping vista of the entire colony against the wild Tasman Sea. For a more compelling shot, look for angles that isolate a single bird or a pair against a clean background, like the deep blue ocean or the sky, to make your subject stand out.

Camera Settings for Sharp Gannet Photos

Photographing these fast-moving birds requires control over your camera settings. Don’t worry, these recommendations are a fantastic starting point for your adventure. We suggest using your camera’s manual or shutter-priority mode for the best results:

  • Shutter Speed: To freeze the gannets in flight, use a fast shutter speed of 1/1000s or higher. For nesting birds, you can use a slightly slower speed.
  • Aperture: An aperture of f/8 to f/11 will give you a deep depth of field, ensuring the entire bird and its immediate surroundings are sharp and detailed.
  • Autofocus: Use continuous autofocus (AF-C or AI Servo) with a single focus point to track the birds as they soar past the cliffs.
  • ISO: Keep your ISO as low as the light allows (e.g., 100-400) to ensure your images are clean and free of digital noise.

Composition and Storytelling

Go beyond a simple portrait and aim to tell a story. Use a telephoto lens (200mm or longer is ideal) to get close to the action and capture tender interactions: the elegant courtship rituals where pairs rub their beaks, the frantic feeding of fluffy chicks, or a bird returning with seaweed for its nest. Use the dramatic cliff edges as leading lines to draw the viewer’s eye into the frame, and compress the scene to convey the immense scale of the colony. While your lens is focused on the birds, it’s vital to respect them and your surroundings. Never use a drone, and always maintain a quiet, respectful distance. For your own wellbeing, be mindful of your footing near the cliff edges and check the latest beach safety tips before you head out.

Capturing Muriwai’s Dramatic Landscapes and Sunsets

While the gannets are often the stars of the show, the stage they perform on is just as breathtaking. Muriwai’s raw, windswept coastline is a photographer’s dream, offering a powerful canvas of dark sands, churning surf, and colossal cliffs. Here, your camera becomes a tool for capturing not just a place, but a feeling-the untamed spirit of New Zealand’s west coast.

Techniques for Black Sand and Crashing Waves

The iconic black sand of muriwai beach provides a unique and moody backdrop. To capture the mesmerising motion of the Tasman Sea, experiment with a slow shutter speed between 0.5 and 2 seconds; this will transform the powerful waves into a soft, ethereal mist. For striking compositions, visit at low tide when the wet sand creates stunning, mirror-like reflections of the sky. We also recommend using a circular polarising filter. This simple tool is invaluable for cutting through ocean glare, deepening the blue of the sky, and saturating the rich, dark tones of the sand.

The Perfect Sunset Shot

As golden hour approaches, Muriwai puts on an unforgettable display. For a classic and powerful composition, position yourself to include the stoic silhouette of Motutara Island against the vibrant sky. This is also the perfect time to capture the gannets in flight, their graceful forms creating dynamic silhouettes against the colourful backdrop. To manage the intense contrast between the bright sunset and the dark foreground, use your camera’s exposure bracketing function. This technique captures multiple exposures that can be blended later, ensuring you retain every beautiful detail from the deepest shadows to the brightest highlights.

Beyond the Beach: Muriwai Regional Park

The photographic opportunities extend far beyond the shoreline. Venture into the wider Muriwai Regional Park, where well-maintained boardwalks and trails offer elevated perspectives of the dramatic coastline. The contrast here is magnificent-the lush, green pōhutukawa and native bush create a natural frame for the wild blue sea below. Look for unique angles along the trails, using the foliage to add depth and context to your seascapes. It’s a wonderful way to tell a more complete story of this incredible landscape. For those wanting to truly master these techniques and uncover the most secret spots, you can join a guided photography tour to discover hidden gems!

Essential Photography Gear and Safety Tips

Capturing the wild, untamed beauty of Muriwai Beach is an unforgettable experience, but a little preparation ensures your adventure is both creative and safe. As with any meaningful journey, having the right tools and knowledge allows you to immerse yourself fully in the moment. Here’s our guide to packing your camera bag and staying safe on Auckland’s magnificent west coast.

Your Muriwai Photography Kitbag

The dramatic landscapes and unique wildlife at Muriwai call for a versatile photography kit. While any camera will capture memories, a few key pieces of equipment will help you create truly stunning images. We recommend packing:

  • A Telephoto Lens: A lens in the 70-200mm range (or longer) is essential for photographing the famous gannet colony. It allows you to fill the frame with the birds’ incredible detail and interactions from the viewing platforms without disturbing them.
  • A Wide-Angle Lens: To convey the immense scale of the coastline, a 16-35mm lens is perfect. It will help you capture those sweeping vistas of the black sand, rugged cliffs, and the vast Tasman Sea.
  • A Sturdy Tripod: This is non-negotiable for sunset or sunrise sessions. A solid tripod will keep your camera perfectly still for long exposures, allowing you to blur the motion of the waves and capture the rich, golden light.
  • Extras: The sea breeze can be cool and drain batteries quickly. Always pack a fully charged spare battery and an extra memory card-you’ll take more photos than you think!

Staying Safe on the West Coast

The power of the ocean is what makes this coastline so spectacular, but it demands respect. Your safety is paramount, so please keep these critical tips in mind as you explore.

  • Never turn your back on the ocean. The west coast is known for unpredictable “rogue waves” that can surge much further up the beach than expected. Always keep an eye on the water.
  • Check the conditions. Before you go, check the surf and tide reports on a site like Metservice. High surf and incoming tides can make certain areas inaccessible and dangerous.
  • Watch your step. The rocks around the gannet colony and blowhole can be extremely slippery, especially when wet. Wear sturdy, non-slip footwear and tread carefully.
  • Stick to marked paths. The viewing platforms and tracks are there for your safety and to protect the fragile coastal environment. Please stay on the designated routes.

With the right preparation, your visit to Muriwai Beach will be a seamless and rewarding photographic adventure. For personally escorted photography tours where every detail is thoughtfully planned, you can explore our upcoming trips at travelwithlesleywhyte.com.

Your Muriwai Masterpiece Awaits

With its dramatic black sand, breathtaking sunsets, and the unforgettable spectacle of the gannet colony, Muriwai Beach is a landscape that begs to be captured. You’re now equipped with the knowledge to time your visit perfectly, compose stunning landscape shots, and photograph the gannets with confidence and respect for their natural habitat.

Imagine elevating this adventure, sharing the experience with like-minded women in a supportive, inspiring community. Our small-group tours are personally escorted by award-winning photographers, helping you discover New Zealand’s most incredible landscapes while honing your craft in a nurturing environment. Ready for an unforgettable photo adventure? Explore our Women in Photography tours!

The wild beauty of the coast is calling. Grab your camera-your next unforgettable image is just a shutter click away.

Frequently Asked Questions About Muriwai Beach

What is the best month to visit Muriwai for gannet photography?

For an unforgettable gannet photography experience, plan your visit between November and February. This is the peak of the breeding season when the colony is bustling with activity, and you’ll have the chance to capture endearing moments of fluffy chicks with their parents. The birds are present from August to March, but this summer window offers the most dynamic and heartwarming photo opportunities against the dramatic coastal backdrop. It’s a truly magical sight.

How long do you need to spend at Muriwai Beach?

While you can enjoy the highlights in a few hours, we recommend dedicating a full day to truly immerse yourself in the experience. This allows for a leisurely coastal walk, time at the gannet colony, and catching a spectacular sunset. For a truly seamless adventure, a full weekend at Muriwai Beach lets you explore at an unhurried pace, discovering hidden gems and connecting with the wild beauty of the west coast without feeling rushed.

Can you fly a drone at Muriwai Beach?

Flying a drone at Muriwai requires careful planning. While it is generally permitted in the regional park, strict rules apply, especially concerning the protected gannet colony. You must maintain a significant distance from the wildlife to avoid causing distress. We always advise checking the latest Auckland Council park rules before your visit to ensure a safe and respectful flight. This meticulous preparation ensures everyone can continue to enjoy this special environment.

Is Muriwai Beach safe for swimming?

Muriwai is a stunning west coast beach, but its powerful surf and strong currents demand respect. For your safety, swimming is only recommended when surf lifesavers are on duty, and you must always stay between the red and yellow flags. Outside of these patrolled areas and times, the conditions can be very dangerous. We want your adventure to be a safe one, so please heed all safety warnings and enjoy the water responsibly.

Are there any cafes or food options near Muriwai Beach?

Absolutely! You won’t go hungry after your coastal explorations. The charming Muriwai village has a couple of wonderful options perfect for a post-adventure meal. You can grab a delicious coffee and a bite to eat at the Muriwai Deli or enjoy a relaxed lunch at the Sand Dunz Beach Cafe. Both offer a warm, welcoming atmosphere where you can refuel and share stories from your day by the sea, making your journey feel complete.

What kind of camera do I need to get good photos at Muriwai?

The best camera is the one you have with you! However, to make the most of your photography adventure, some specific gear helps. For capturing the gannets from the viewing platforms, a telephoto or zoom lens (like a 70-200mm or 100-400mm) is invaluable for getting close-up shots. For the sweeping black-sand landscapes and dramatic sunsets, a wide-angle lens will allow you to capture the immense scale and beauty of the scene.